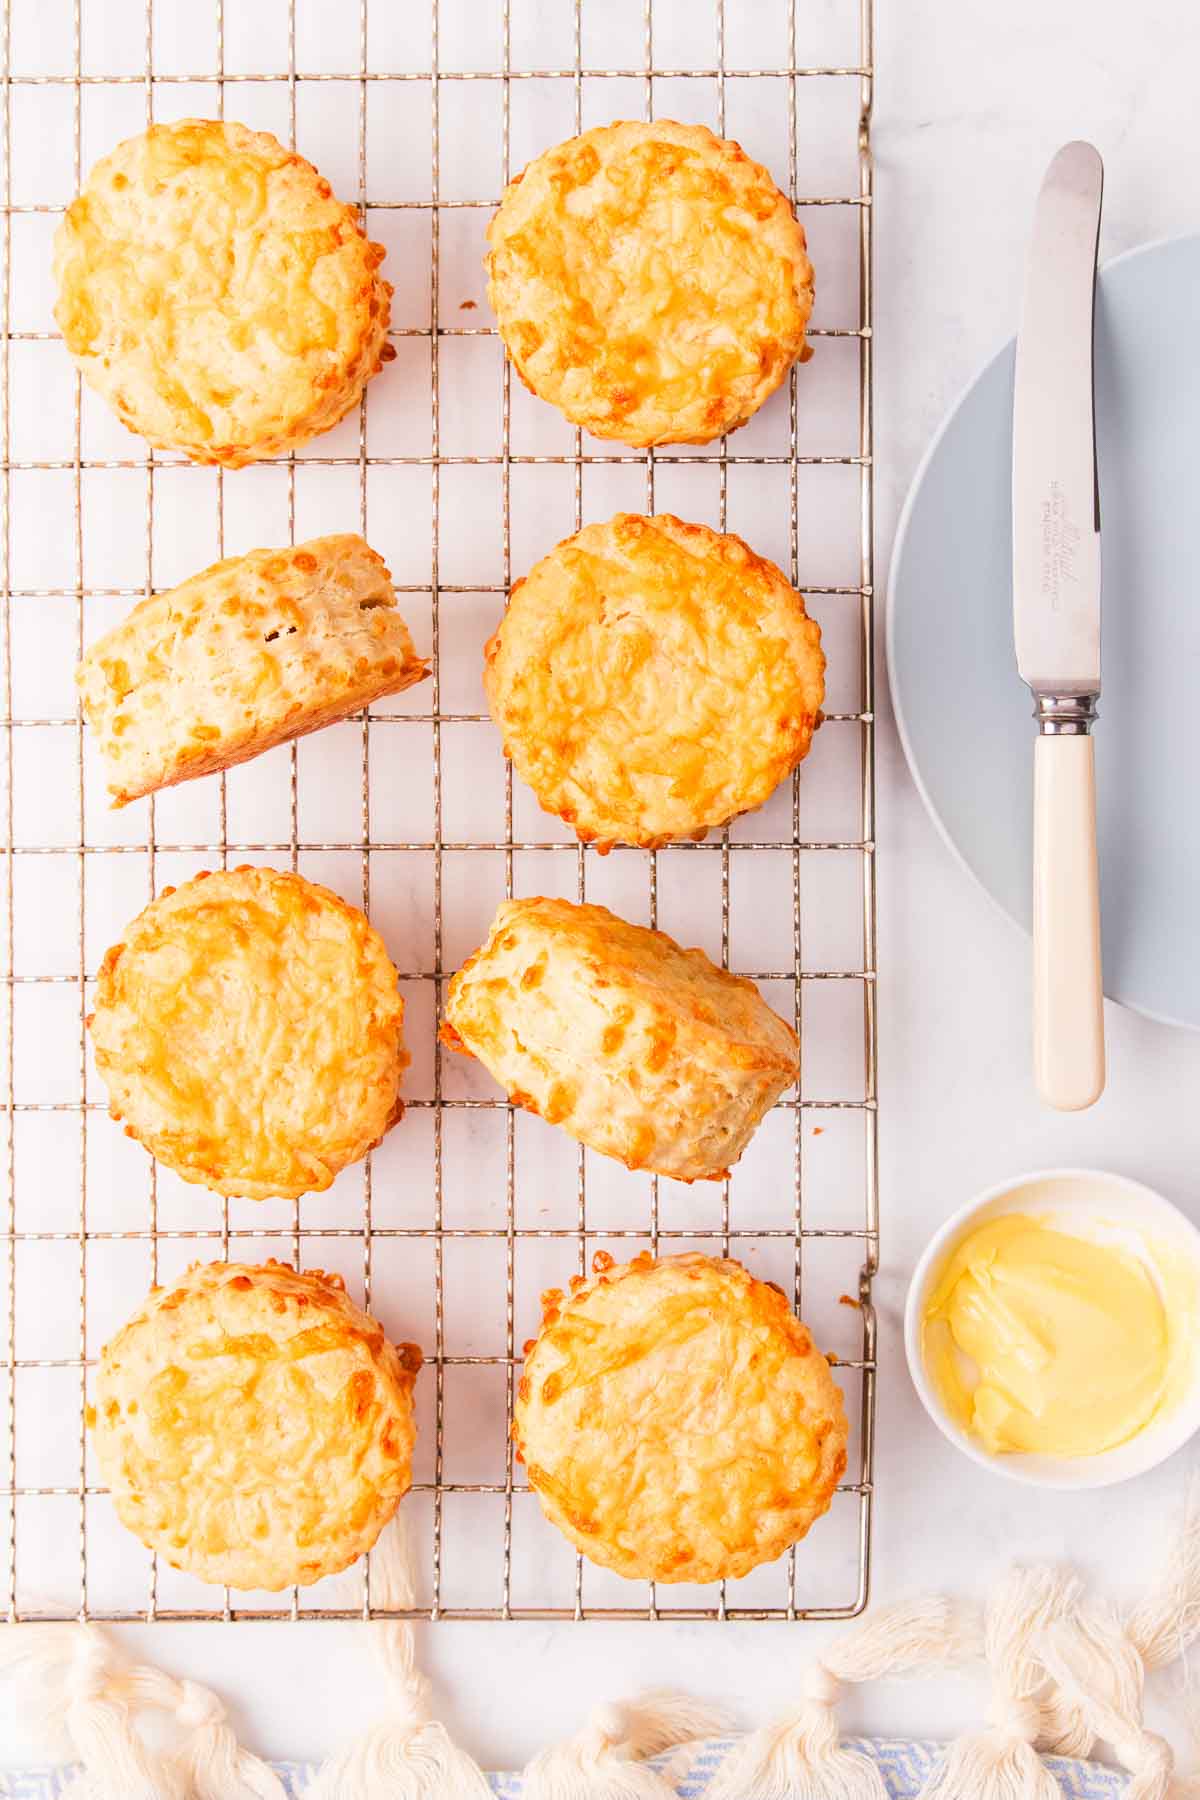
Gluten Free Cheese Scones
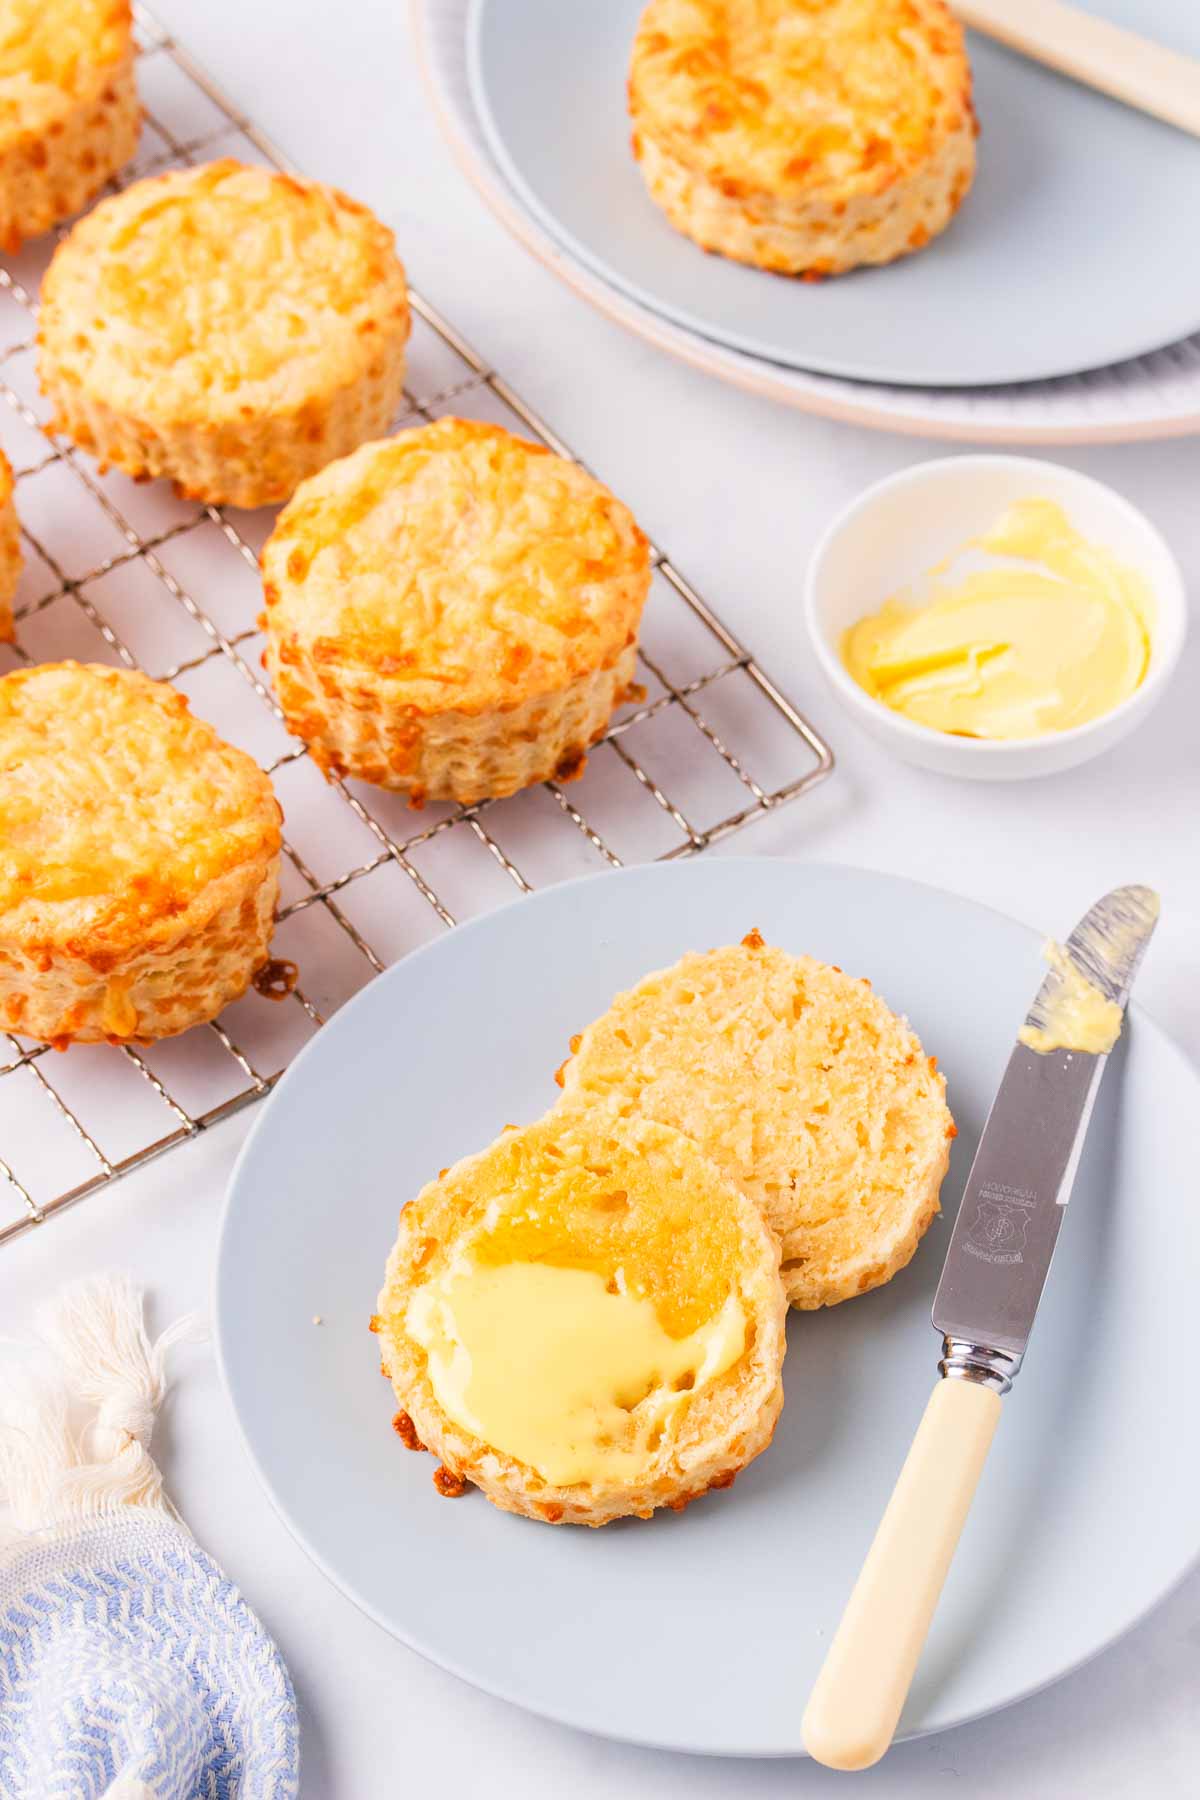
These easy gluten free cheese scones have that perfect crunchy outside and are packed with deliciously savoury cheese flavour. They can be frozen baked or raw, and they can even be baked in the air fryer!

The iconic Mainland cheese ad may declare that good things take time, but luckily for us, these gluten free cheese take hardly any time at all, and dare I say it, they’re better than good. They’re absolutely delicious.
Whether you prefer them warm from the oven with a generous spread of butter, or if you like them with a multitude of toppings, these scones are sure to be a brunch, lunch or afternoon tea staple in no time.
This recipe is a bit different to most scone recipes because it’s based on a recipe my Nonna used to make which uses cream instead of butter, so you don’t need to cut butter into the flour. You just put all the dry ingredients and grated cheese into a bowl and mix in the cream and egg.
These aren’t quite as flaky as a scone made with rubbed butter, but they are a lot quicker and easier to make and the result is still light and deliciously cheesy savoury scones.
That scone recipe is based on the same dough I use to make gluten free pinwheel scones – so if you enjoy these cheese scones, you might want to check out the pinwheels next.
Scroll down to the recipe card for the full ingredients list and printable recipe, or keep reading for ingredient tips and process photos.
Ingredients
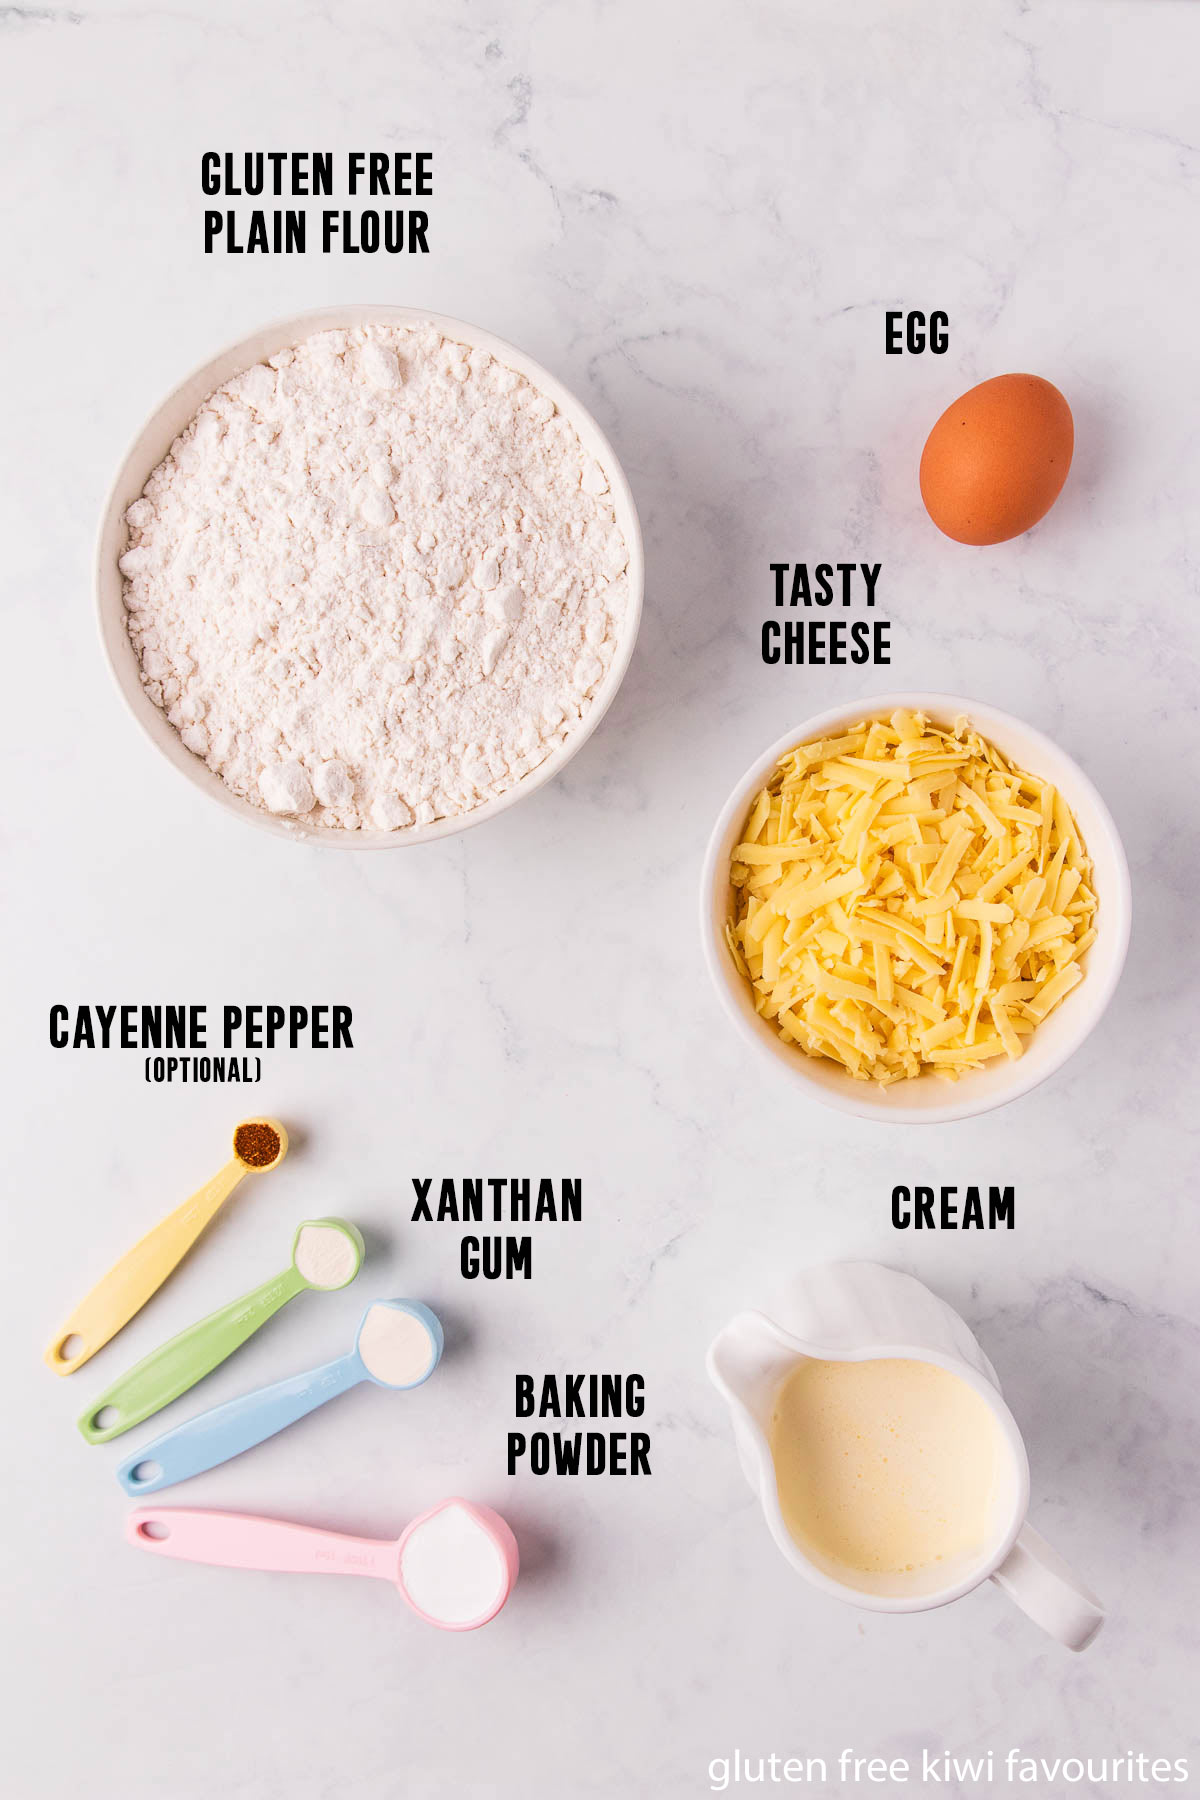
Gluten free plain flour – I prefer my homemade gluten free flour blend (which contains tapioca starch, brown rice flour and potato starch) in this recipe, but a store-bought gluten free plain or all purpose flour will also work. Because different gluten free flours absorb liquid differently, you may need to tweak the liquid amount slightly depending on the flour you use.
Xanthan gum – This helps stop the scones from being toooo crumbly. Omit if you’re using a gluten free flour blend that contains a gum ingredient.
Baking powder – Make sure your baking powder is gluten free (most are, but it always pays to check).
Cayenne pepper – This is optional, but we like a little bit of heat in a cheese scone, and it also gives them a bit more flavour. Other nice additions include paprika, white pepper, garlic powder, onion powder or mustard powder. Or if you want some fresh flavour, add some chopped fresh chives or rosemary.
Cheese – A strong-flavoured cheese like Tasty or any other kind of cheddar cheese is best in this recipe.
Egg – You’ll need one large egg for this recipe.
Cream – I just use regular cream in this recipe. If you like to be able to make scones anytime and don’t always have fresh cream in the fridge – I recommend keeping some cartons of long-life (UHT) cream in the pantry. They are usually 250ml, so you’ll need two for this recipe. UHT cream is often a bit thicker than fresh, so if you need a little bit of extra liquid, you can add some milk or even water.
How to Make Gluten Free Cheese Scones
Start by preheating your oven – for the puffiest scones it’s really important that the oven is hot, so make sure you give it time to fully heat up!
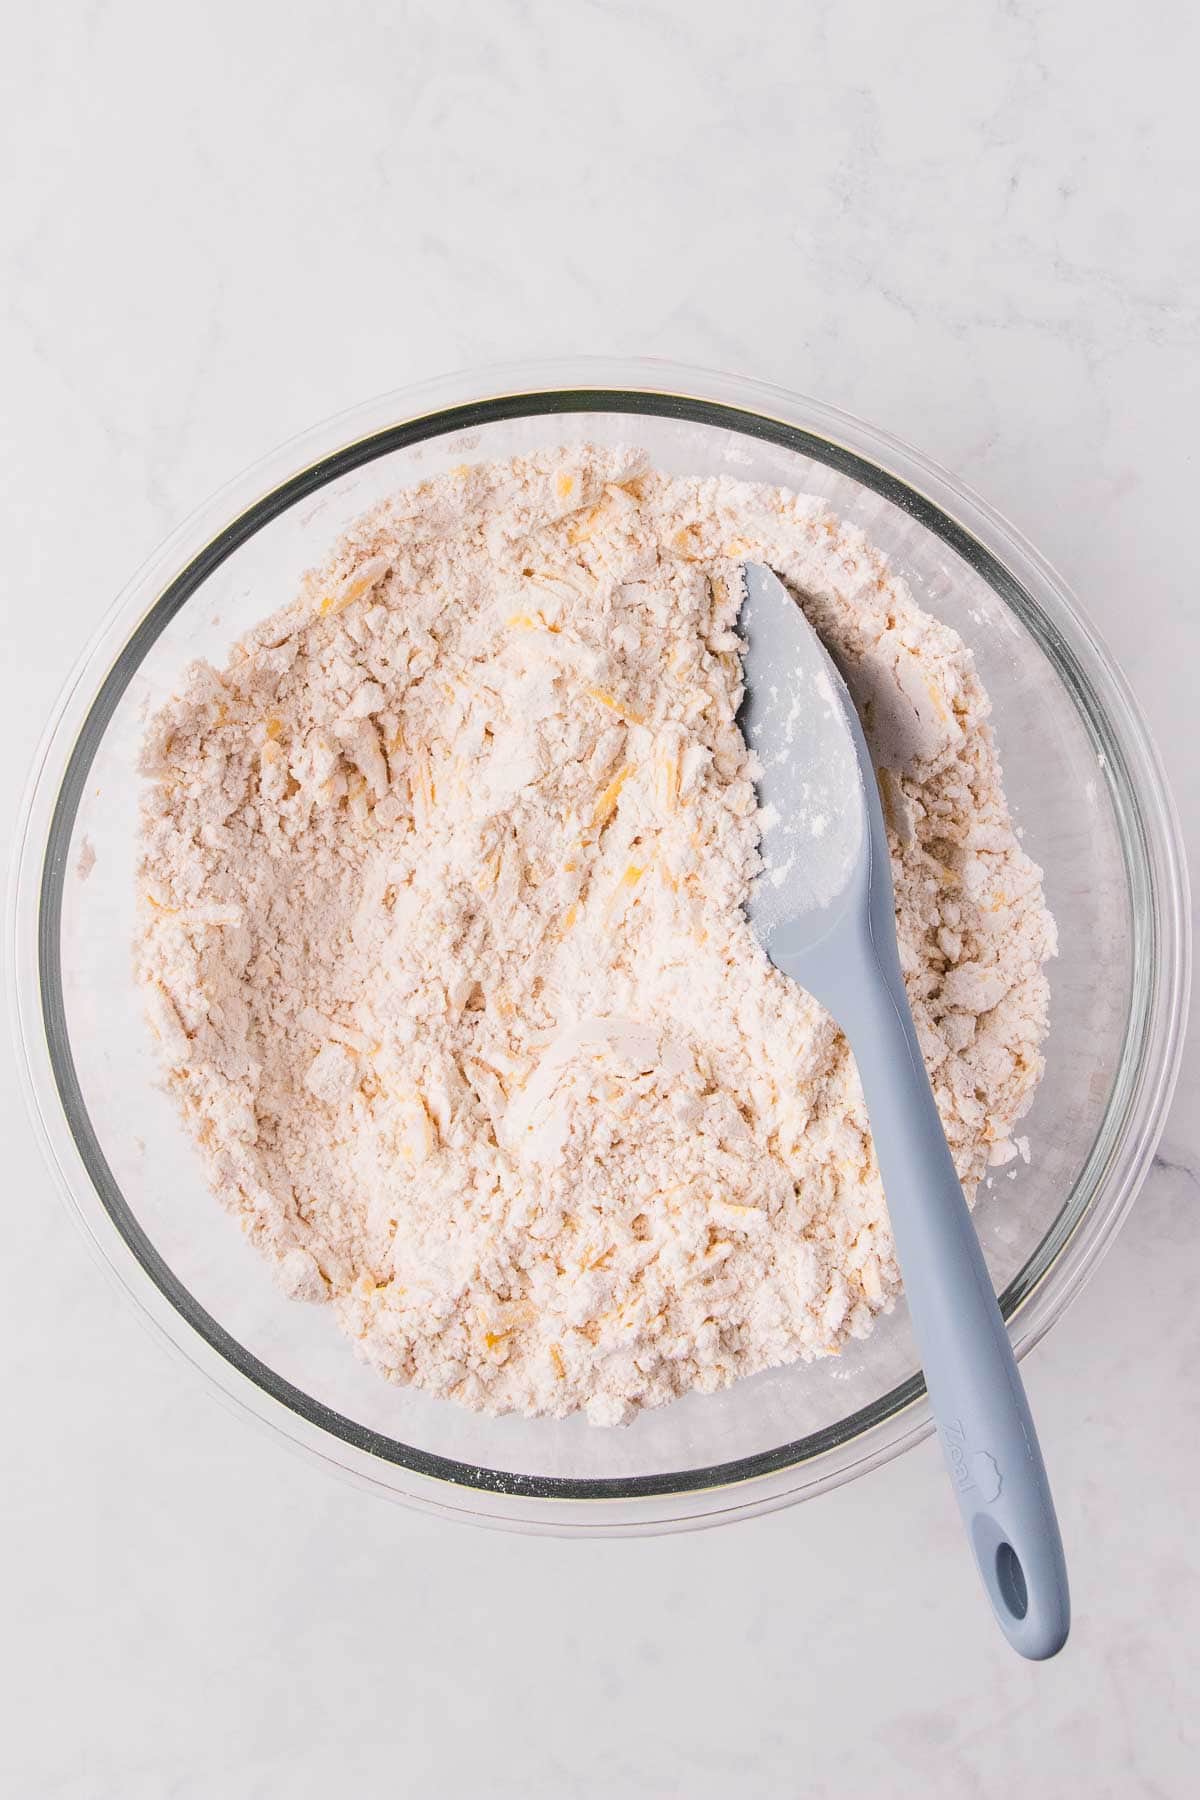
Chuck all the dry ingredients into a large mixing bowl, then give them a good whisk to combine well and make sure the baking powder is evenly distributed.
Coarsely grate the cheese, then add it to the dry ingredients and give it a good mix. If the cheese is clumping together, get your hands in there and give it a rub around to break it up.
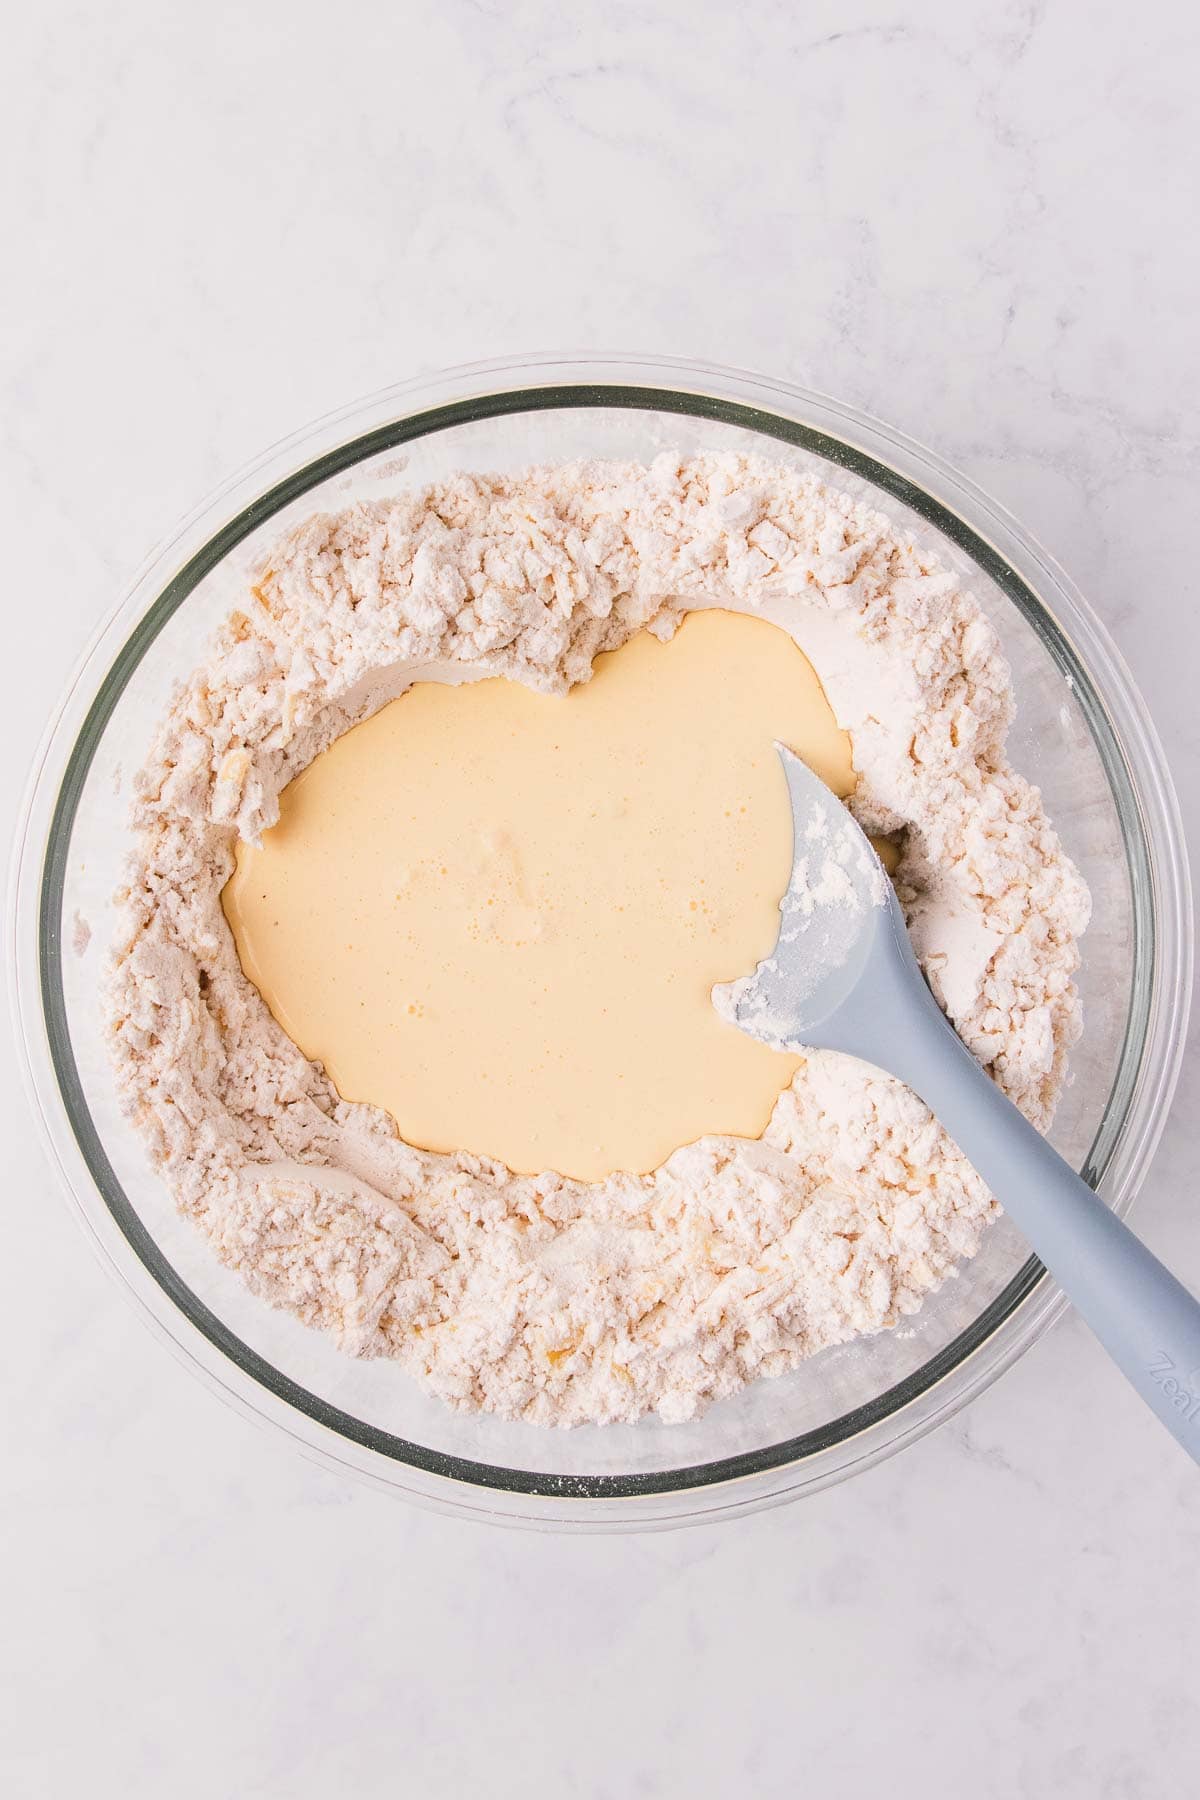
In a small bowl or jug, whisk the eggs and add about 3/4 of the cream (don’t measure, just eyeball it).
Add the wet ingredients to the dry ingredients, and gently mix. If the mixture is too dry and there is still a lot of loose flour in the bottom of the bowl, add more of the remaining cream until it comes together.
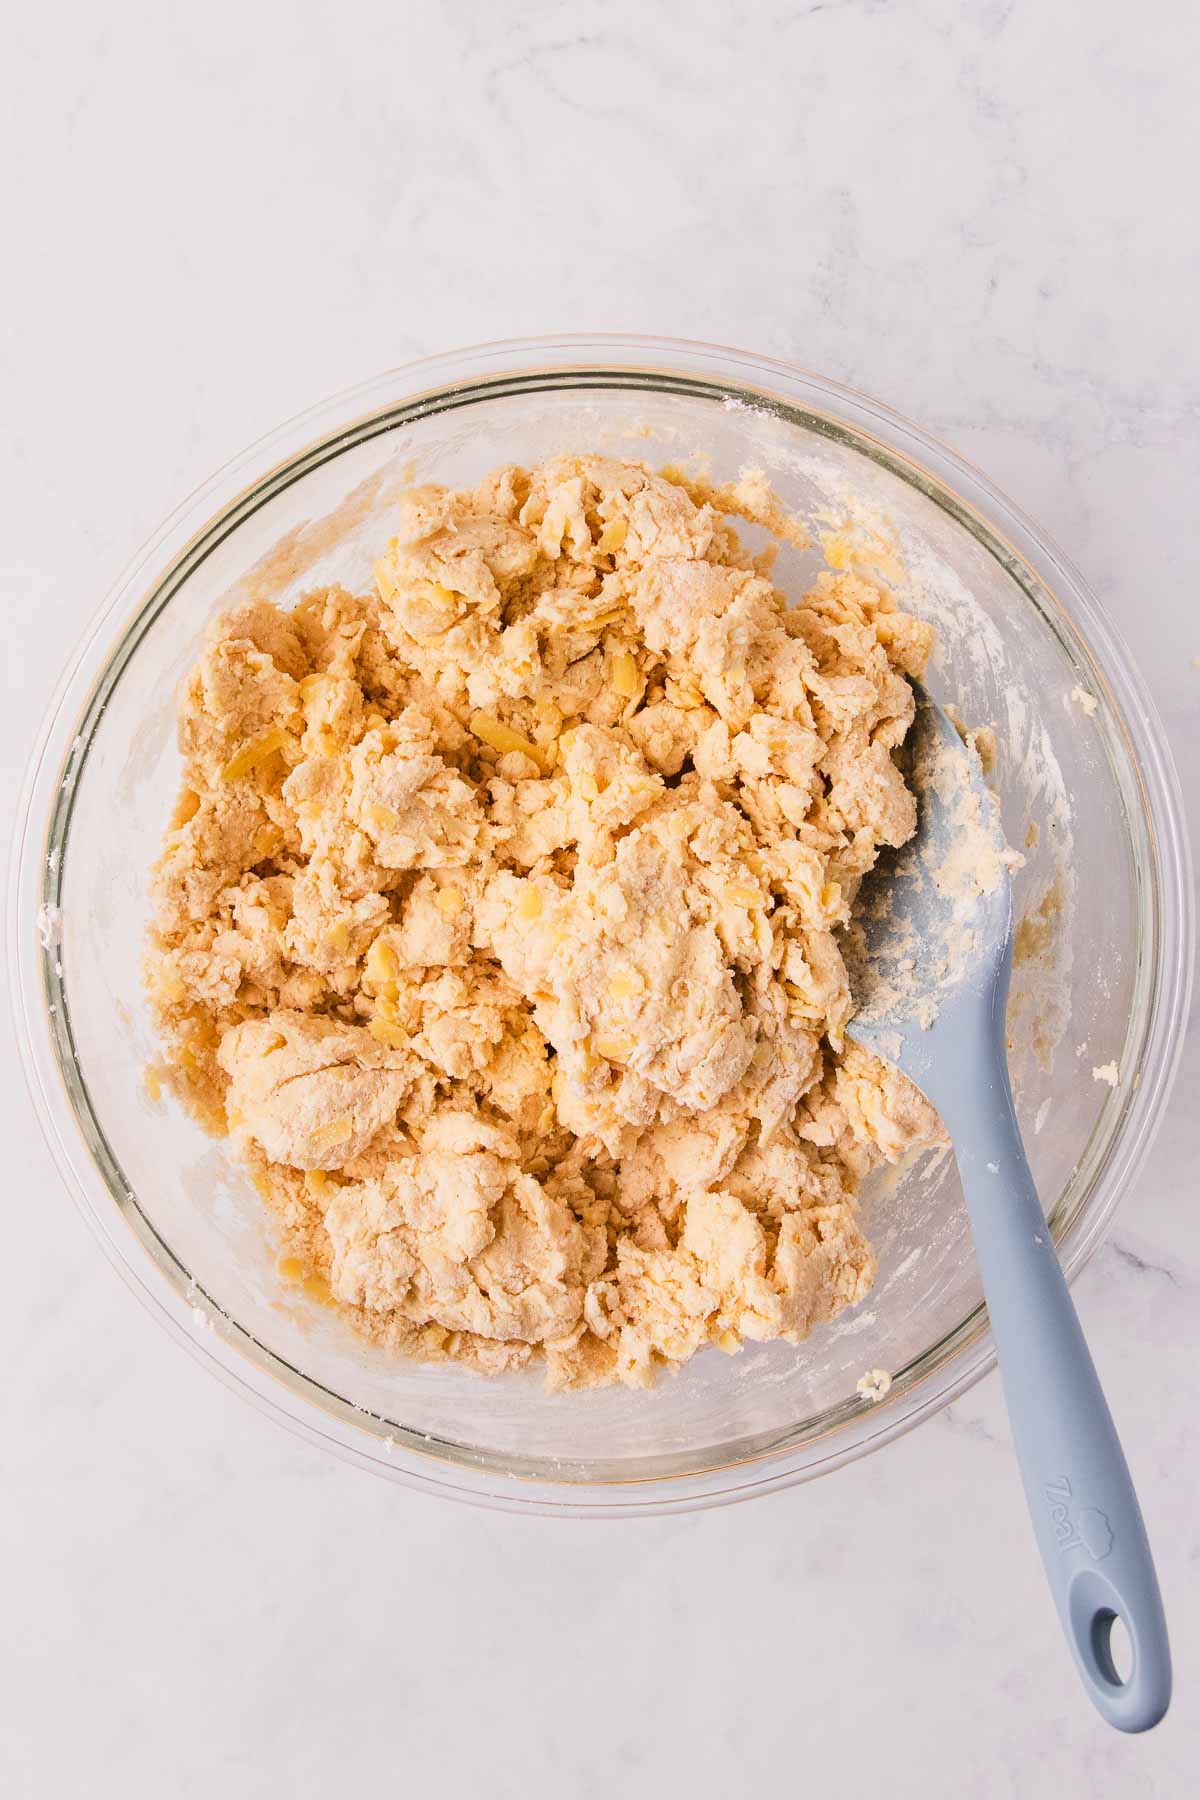
The mixture should be quite shaggy and not smooth, but it should be able to come together. If you’ve added all of the cream and it’s still too dry, add a little milk.
Because different gluten-free flours absorb liquid in different amounts, you may need more or less, depending on the flour you choose. Keep an eye on how much liquid you end up using – and make a note of it for next time.
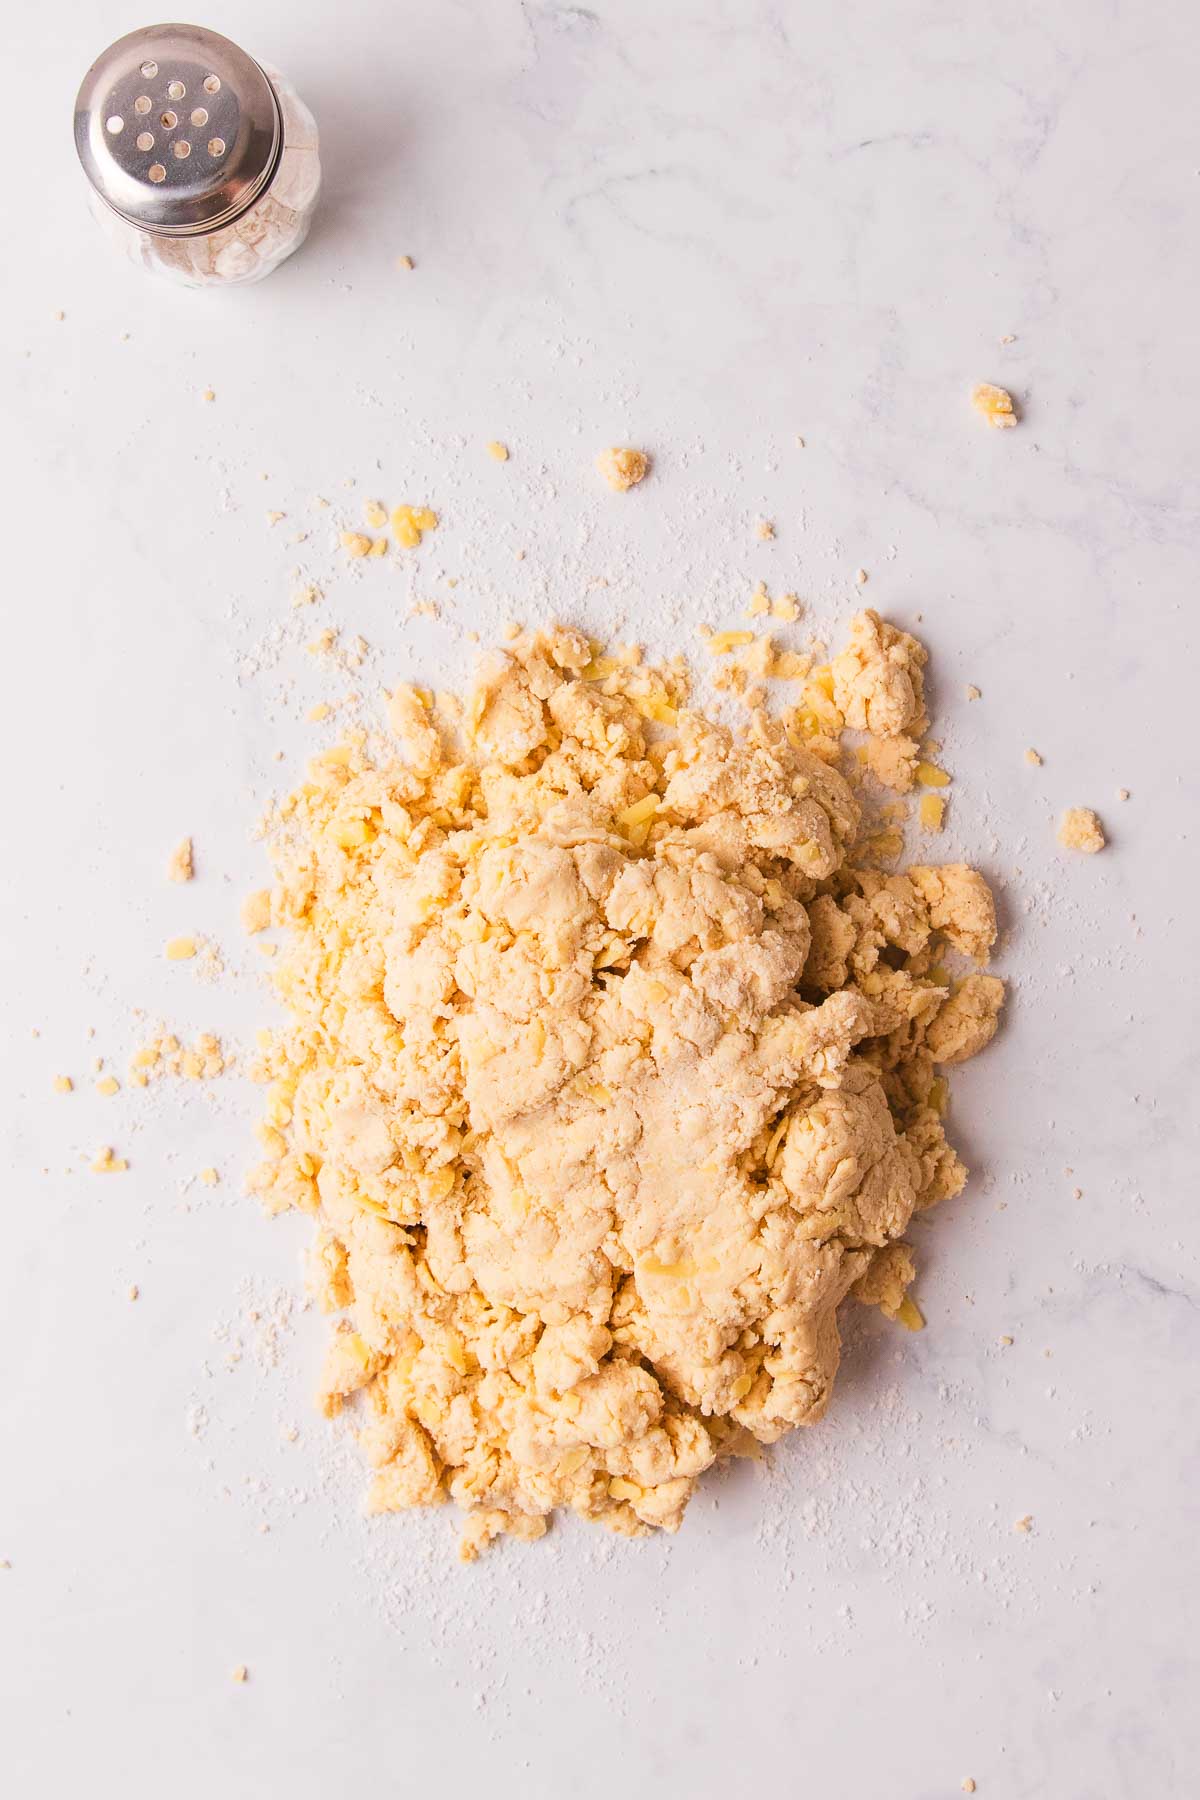
Sprinkle your bench with a little more gluten free flour, then tip out the scone dough and knead gently to bring it together. For the best texture, don’t overwork the dough too much.
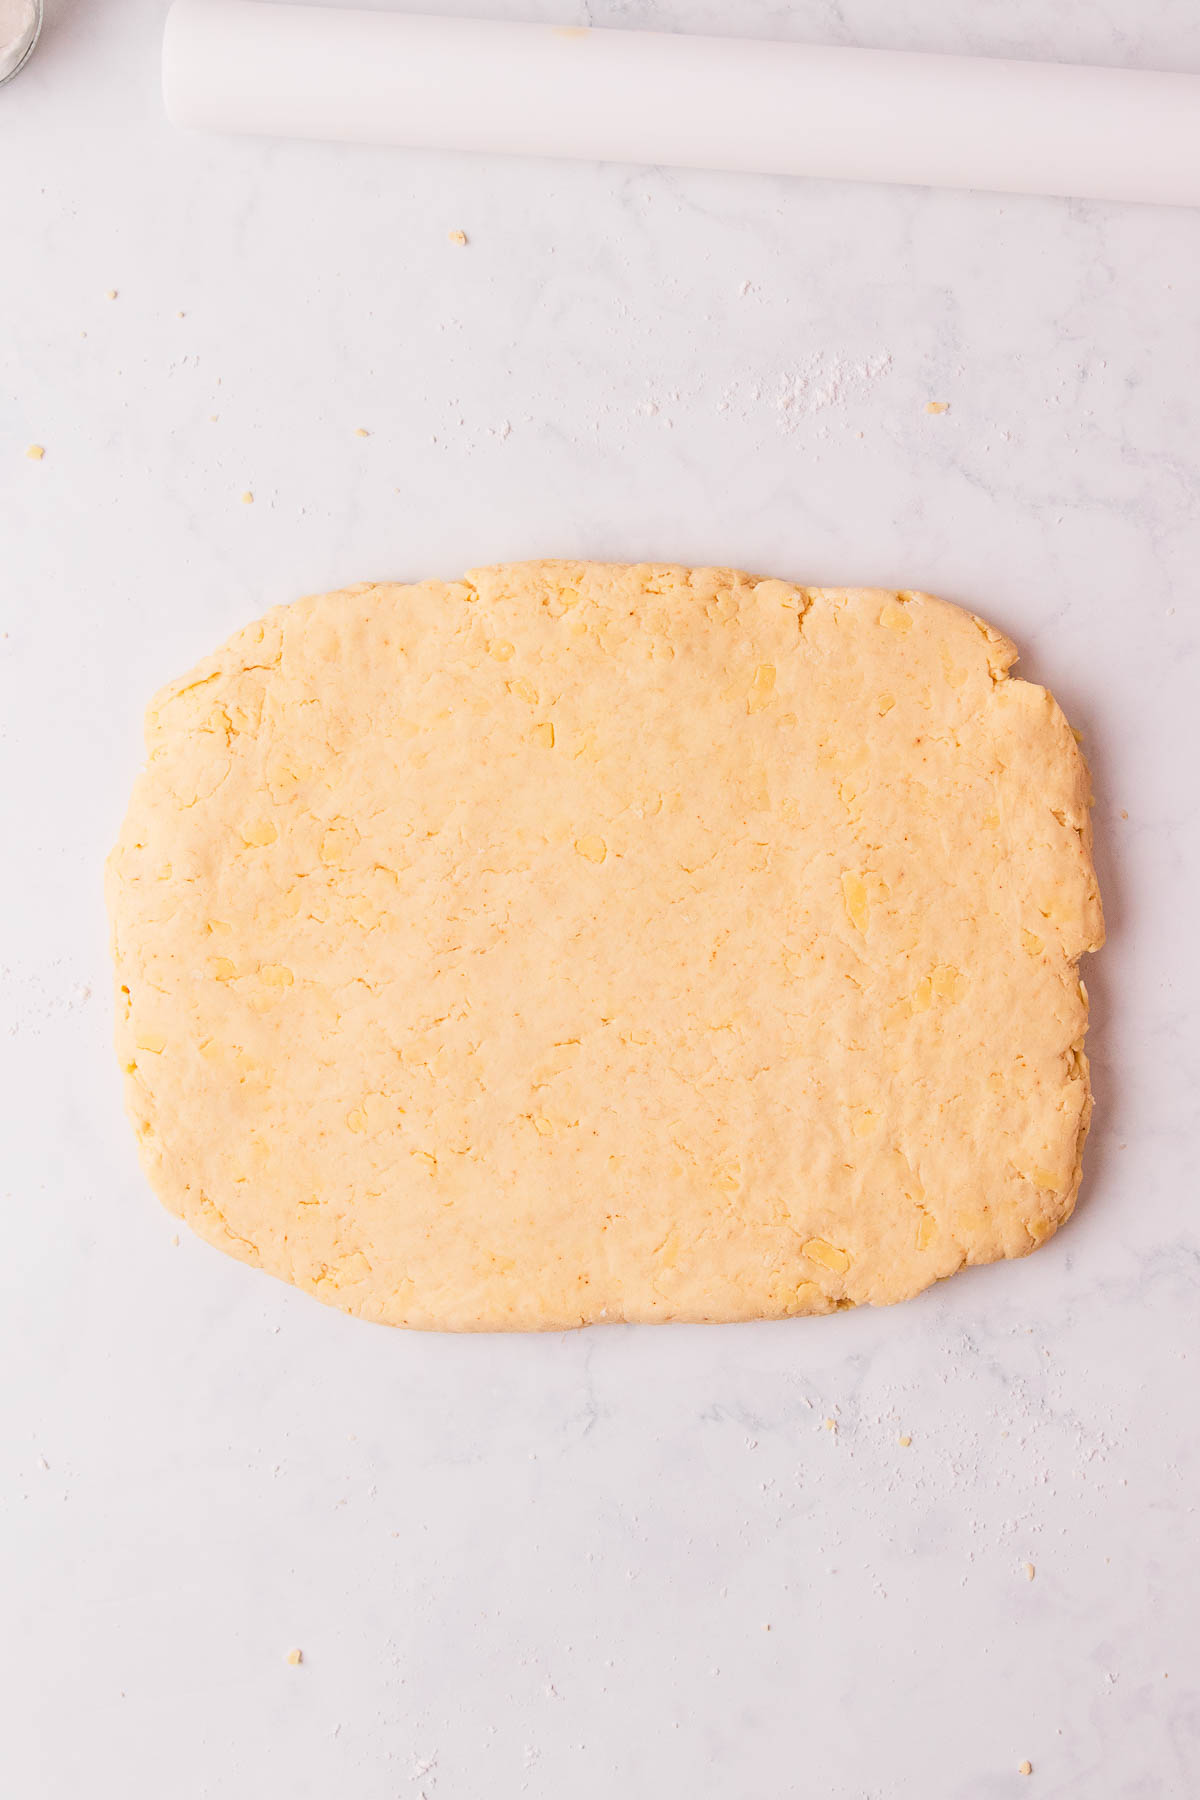
Pat or roll out the dough until it’s around 3cm thick (make sure there is still a bit of flour underneath so it doesn’t stick).
Cut out your desired scone shapes. When I’m in a rush I just pat the dough into a rectangle and cut it into pieces with a large knife. Or pat it into a round and cut it into wedges. If you’re feelin’ fancy, like I was here, you can cut them into shapes with a fluted cookie cutter or scone cutter.
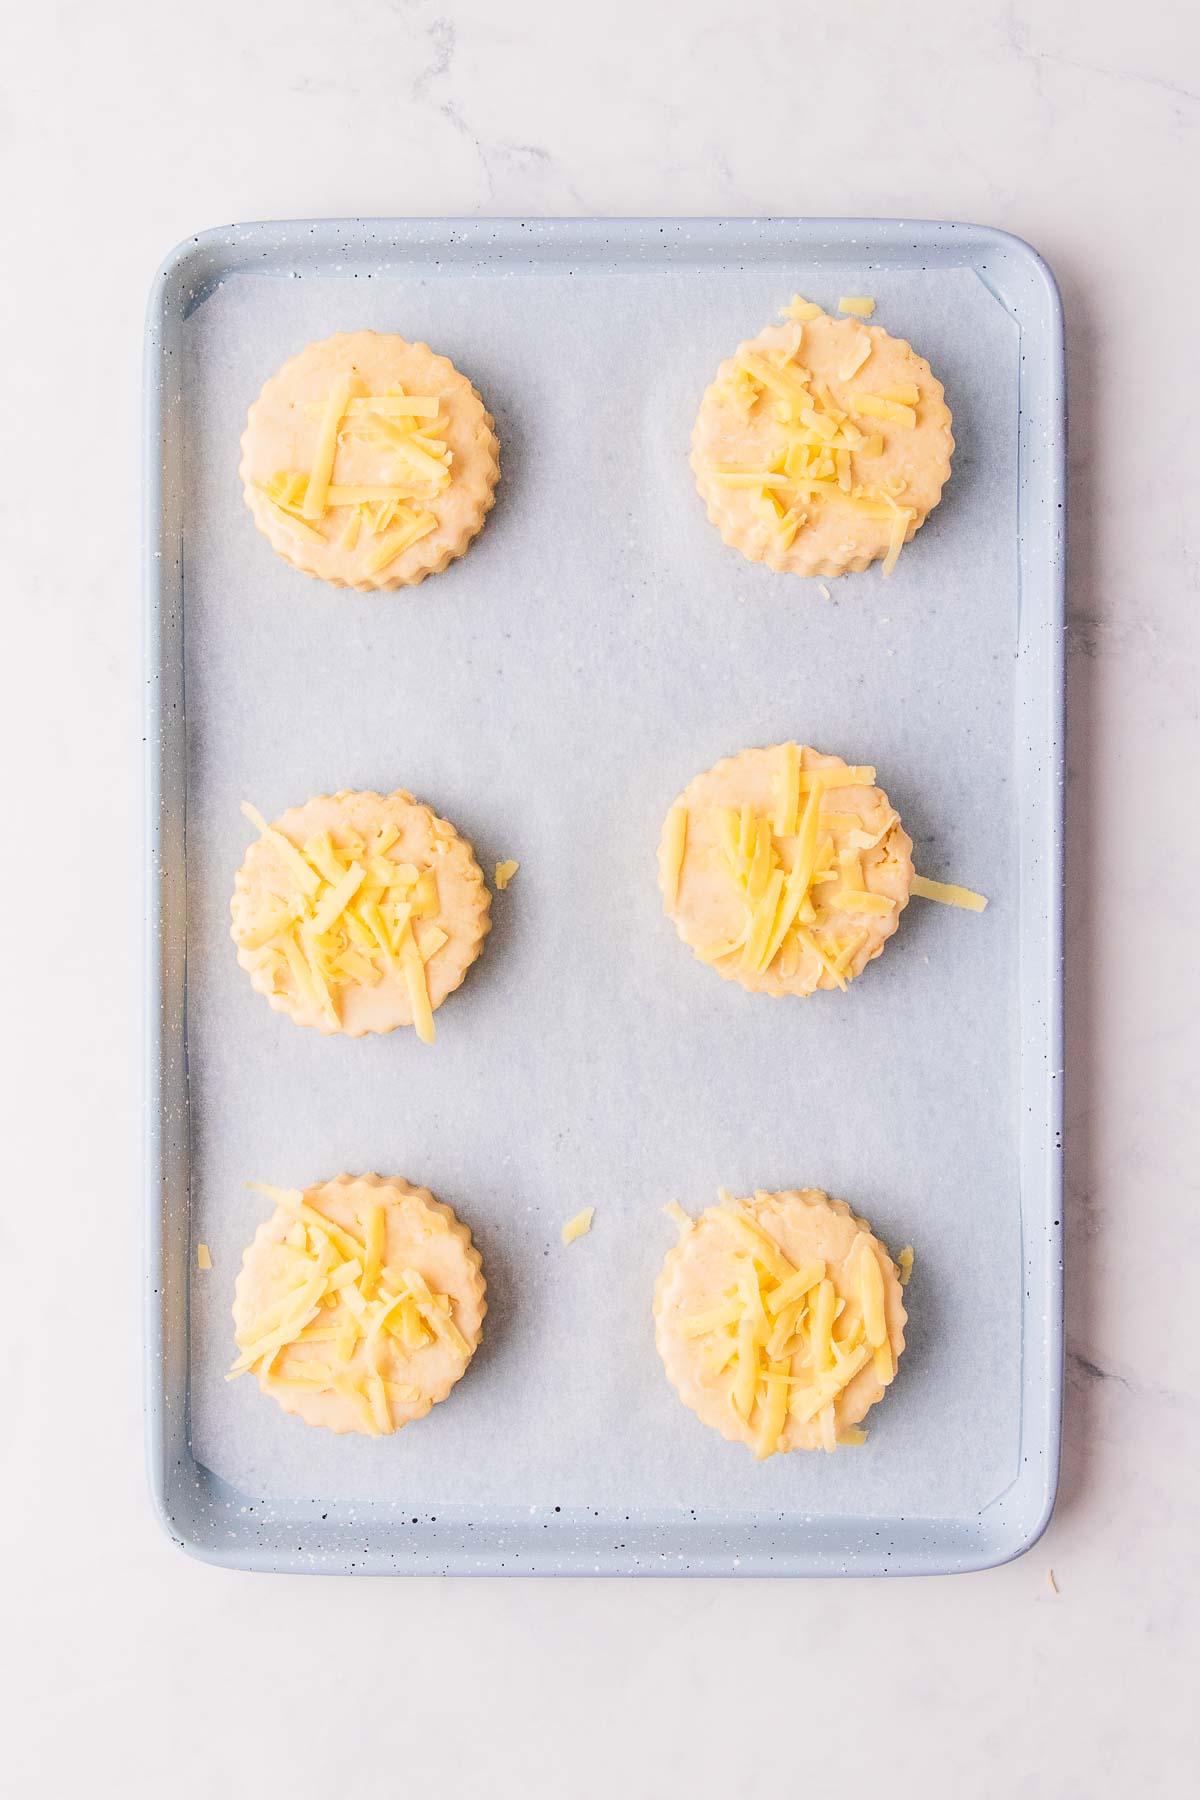
Place the scones onto a baking paper lined baking tray and brush them with some extra cream or milk. I like to put a splash of milk into the egg and cream jug and use that, as it makes a nice egg wash. Sprinkle the top of the scones with a little extra grated cheese if you like.
Bake in a preheated oven until well-risen and lightly golden brown on top.
As with most scones, these are at their best on the day they’re made, but leftover scones can be stored in an airtight container for a couple of days. Reheat them for 10-20 seconds in the microwave to freshen them up, or split them in half and pop them in the toaster to re-crunch* the crust.
*Re-crunch is not a word, but just humour me.
Freezing the Scones
The scones can be frozen before or after baking.
Freeze before baking – Cut out your scone dough into your desired shapes, then place on a baking paper lined baking tray and freeze until firm. Wrap the frozen dough pieces in plastic wrap or baking paper (I do them in pairs), pop them into an airtight container or resealable plastic bag and freeze.
The scones are best baked from frozen rather than thawing first. Add an extra 2-5 minutes to the baking time when baking from frozen.
Freeze after baking – Allow the baked scones to cool to room temperature, then wrap and place in an airtight container as described above. Allow to thaw, then reheat in the microwave or toaster before eating.
If you’re trying to choose between freezing before or after baking, I recommend before, and then baking them fresh when you want them.
Air Fryer Gluten Free Cheese Scones
When my mother got an air fryer I didn’t think I’d ever find myself trying to bake in it, but here we are. I had some frozen scones and wanted to see if they’d bake in the air fryer, since it’s so convenient. You don’t need to wait for an air fryer to preheat like an oven, so while they take about the same amount of time to bake, it’s still faster without the preheating.
You’ll need to check your air fryer model instructions for baking, but in Mum’s air fryer (which is the Instant Pot Duo Crisp) the scones took about 17 minutes at 190°C on the bake setting from frozen, and about 15 minutes at the same temperature with freshly made dough or when frozen then thawed before air frying.
Only bake as many scones at a time as can fit comfortably in your air fryer with space to spread.
Because there are so many different models of air fryers I can’t guarantee that the scones baked in yours will be as perfect as they are in the oven, but it’s definitely worth a try.
Keeping the dough in the freezer and baking in the air fryer means you can have freshly baked gluten free cheese scones on the table in less than 20 minutes!

GF Cheese Scone Topping Ideas
- A wedge of butter… or you could just do a smear of butter, but I like a whole lot of butter on a cheese scone. That’s all. Just butter. (The following suggestions are from Coeliac Dad, who likes a variety.)
- A nice gluten free pickle, chutney or relish
- Gluten free Vegemite
- Cream cheese
- Slices of cheese (can you ever have too much cheese? I don’t think so)
- Sliced gluten free pickled onions
- Cold meats (ham, salami, pastrami etc.)
- Marmalade – this is 100% Dad so don’t judge me on this. I asked him for his suggestions and that’s one of his go-tos, so do with that information what you will.
Are you new to gluten-free baking?
Or just need some tips on how to make the most of the recipes on GFKF? Check out my start guide to learn how to bake safely and successfully gluten free.
Allergen safety ✔️ Gluten free flour info ✔️
Accurate measuring ✔️ Tools + Equipment ✔️
More gluten free baking recipes you may like…
Gluten Free Pinwheel Scones
Gluten Free Anzac Biscuits
Gluten Free Muesli Bars

Gluten Free Cheese Scones
Ingredients
- 450 g gluten free plain flour, see notes
- 1 Tablespoon baking powder
- 1 ½ teaspoons xanthan gum, omit if your flour blend contains a gum ingredient
- ¼ – ½ teaspoon cayenne pepper, optional, see notes
- 150 g tasty cheese
- 1 large egg
- 1 ½ cups cream, (375ml)
- A little extra grated cheese for the top, optional
Instructions
- Heat oven to 200°C. It's really important that the oven is hot when baking scones, so make sure you give it time to fully heat up. Line a large baking tray with baking paper.
- Sift the gluten free flour, baking powder, xanthan gum and cayenne pepper (if using) into a large bowl, and whisk to combine well.
- Coarsely grate the cheese and add it to the dry ingredients. Mix well, breaking up any lumps of cheese with your fingers if needed.
- In a small jug or bowl, whisk the egg, then whisk in the cream.
- Pour the egg/cream mixture into the dry ingredients and stir gently.The dough should be a bit scraggly and crumbly, but if you pick some up in your hand it should hold together when you squeeze it gently. If it doesn't, stir in a little more cream or some milk, until the consistency is right.Don't rinse out the jug from the cream mixture, we'll use it later.
- Tip the dough out onto a clean benchtop and knead gently just until the dough holds together – the less you work it, the lighter the scones will be. Lightly flour the bench and pat or roll the dough out to about 3cm thick.
- Different ways to cut the dough:– Shape the dough into a rectangle and cut into smaller rectangles/squares using a large sharp knife.– Pat the dough into a circle, and cut it into wedges.– Cut the dough into shapes using a round fluted cookie cutter. Gently press the scraps together then re-roll and continue to cut more shapes.
- Place the scones onto the prepared baking tray.Add a little splash of extra cream or some milk to the jug you mixed the egg and cream in, give it a mix to make an egg-wash, then brush that onto the tops of the scones. Sprinkle with extra grated cheese if you like.
- Bake for 15-20 minutes, or until well-risen and lightly golden brown on top. The exact time will depend on the size of your scones, so keep an eye on them, and make a note of how long they take for next time.
- Allow the scones to cool for a few minutes on the tray, then transfer to a cooling rack.
- Scones are at their best the day they're made, but these will keep in an airtight container for a couple of days. Reheat gently in the microwave before eating.
To Bake in the Air Fryer
- Check your air fryer manual for instructions suited to your model. As a guide, I baked mine at 190°C on the bake setting for 15 minutes or 17 minutes with frozen dough.
To Freeze the Scones
- Freeze before baking – Cut out your scone dough into your desired shapes, place on a baking paper lined tray and freeze until firm. Wrap the frozen dough pieces in plastic wrap (I do them in pairs), pop them into an airtight container or resealable plastic bag and freeze.You can bake the scones from frozen, no need to thaw first. Add an extra 2-5 minutes of baking time if baking from frozen.
- Freeze after baking – Allow the baked scones to cool to room temperature, then wrap and place in an airtight container as described above. Allow to thaw, then reheat in the microwave or toaster before eating.
Notes
I hope you enjoy this gluten free cheese scones recipe, and if you’d like to see more savoury recipes, let me know in the comments which ones you’d like me to make ❤
Hi Natalie
Haven’t made scones yet but very excited to have the recipe. Using this space just to tell you I made the afghans last week and they were amazing. Thanks so so much for your work. Lesley
Hello
I am going to try the scones, have made up your gluten free flour mix.
However can I substitute the cream for a non diary alternative, thanks Liz
Hi Liz, I’m sorry, I haven’t tested this recipe with a non-dairy alternative for the cream. Alpro soya cream could possibly work, however it is much lower in fat than dairy cream, so the results may not be quite the same. Sorry I can’t be more help!
Just made these tonight sooo yummy and so light and fluffy! Came together so quickly too
Thanks, Holly! I’m so happy you enjoyed them!
Delicious with chives and some grated Parmesan, mustard powder instead of cayenne! Will definitely make again, knowing to add more cream with the Woolworths gluten free plain flour.
My wife died 4 yrs ago and I am just learning to cook things other than main meals (ie Meat & Veg etc).
I cooked some GF Scones two weeks ago & they ‘weren’t too bad’ (not your recipe).
Today I decided to try Cheese scones, and found your recipe… made a batch slightly bigger in order to finish all the Cream in the frig – incidentally 80% of that cream was ‘Sour Cream’.
Finished with the best batch of scones I have ever tasted – I never knew Cheese Scones could finish up ‘light’ – even non-GF cheese scones usually finish heavy.
Great recipe!
Can’t wait to try your Anzac Biscts recipe!
Hi Frank! I can’t tell you how much I appreciate reading your comment. I’m so glad to hear that you enjoyed the scones that much.
My grandmother, whose recipe this is based on, used to use cream that had gone sour in the fridge and her scones were just the best. She lived through the war in Italy, so she didn’t like to let food go to waste. I can’t responsibly recommend in the recipe that people do that because of the food safety risk, but I must try this with actual sour cream from the supermarket one day. Sounds like your scones were incredible 💜
Best of luck with all of your baking and I really hope you enjoy the Anzac biscuits!
Best GF cheese scone I’ve tried making. Thanks. Would love to see more savoury baking recipes.
These turned out great! A decent sized batch and husband loved the cayenne. Just quite messy to bring the dough together – take your rings off.
This time, making them on the fly, I used self-rising GF flour (leaving out the next two ingredients) and sour cream with a bit of water and they were even better.