Gluten Free Playdough
This gluten free playdough recipe is so easy to make and fun for kids of all ages. Safe for people with Coeliac Disease and those with wheat allergies to play with.
Ok so it’s not a food recipe, but let’s talk about making gluten free play dough!
I see a lot of questions in Coeliac groups about whether regular play dough is safe and how you can make gluten-free playdough. And I get it – going gluten-free can be overwhelming and so many things that you may not have even thought about have gluten in them.
I’m sure that being the parent or caregiver of a gluten-free child is tricky enough, so let’s make something easy with this homemade gluten-free playdough recipe.
While I don’t have kids of my own, I’m a big kid at heart, so I really wanted to nail this recipe. Luckily I have two Industry Experts on hand, our littlest neighbours Kate and Zara, who have thoroughly tested this playdough out for me, and helped me choose which of my many test batches was the best.
While this isn’t quite as cheap as homemade play dough made with wheat flour, it’s still cheaper than buying Playdoh, and, of course, it’s safe for Coeliacs. One 900g batch of this gluten free playdough cost me less than $4 to make (at the time of writing this post) and it can often be cheaper if you purchase ingredients in bulk or on special.
In this post, I’ll answer some questions and give you a gluten-free play dough recipe that is super easy to make with ingredients that are easy to find in most supermarkets.
Here’s what’s great about this gf playdough recipe:
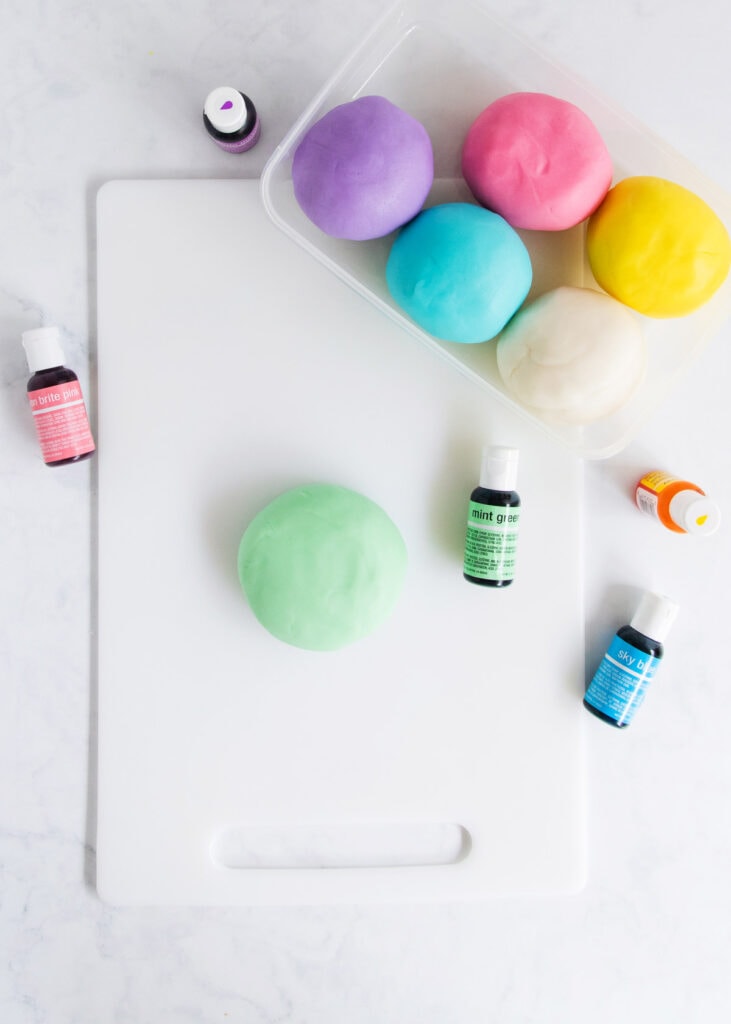
Gluten free play dough ingredients:

- White rice flour – This is usually available in either the baking aisle or the gluten free aisle at the supermarket.
- Cornflour – Also known as corn starch, this is usually used for thickening sauces, the cornflour gives the playdough a lovely smooth texture. Make sure you don’t buy wheaten cornflour – which contains gluten. I usually buy Edmond’s cornflour, as it is labelled as gluten free.
- Table salt – This helps preserve the playdough and stop mould from growing. Any brand of table salt will do – it doesn’t matter if it’s iodised or not, however, iodised salt sometimes has little black flecks in it, so if you don’t want that, use plain table salt.
- Vegetable oil – Any kind of vegetable oil should work here, I use rice bran oil but olive oil should also work, and melted coconut oil will probably work, too. If your child has nut allergies as well, you’ll obviously want to avoid nut oils such as peanut oil.
- Cream of tartar – This also helps to preserve the playdough and improves the texture as well.
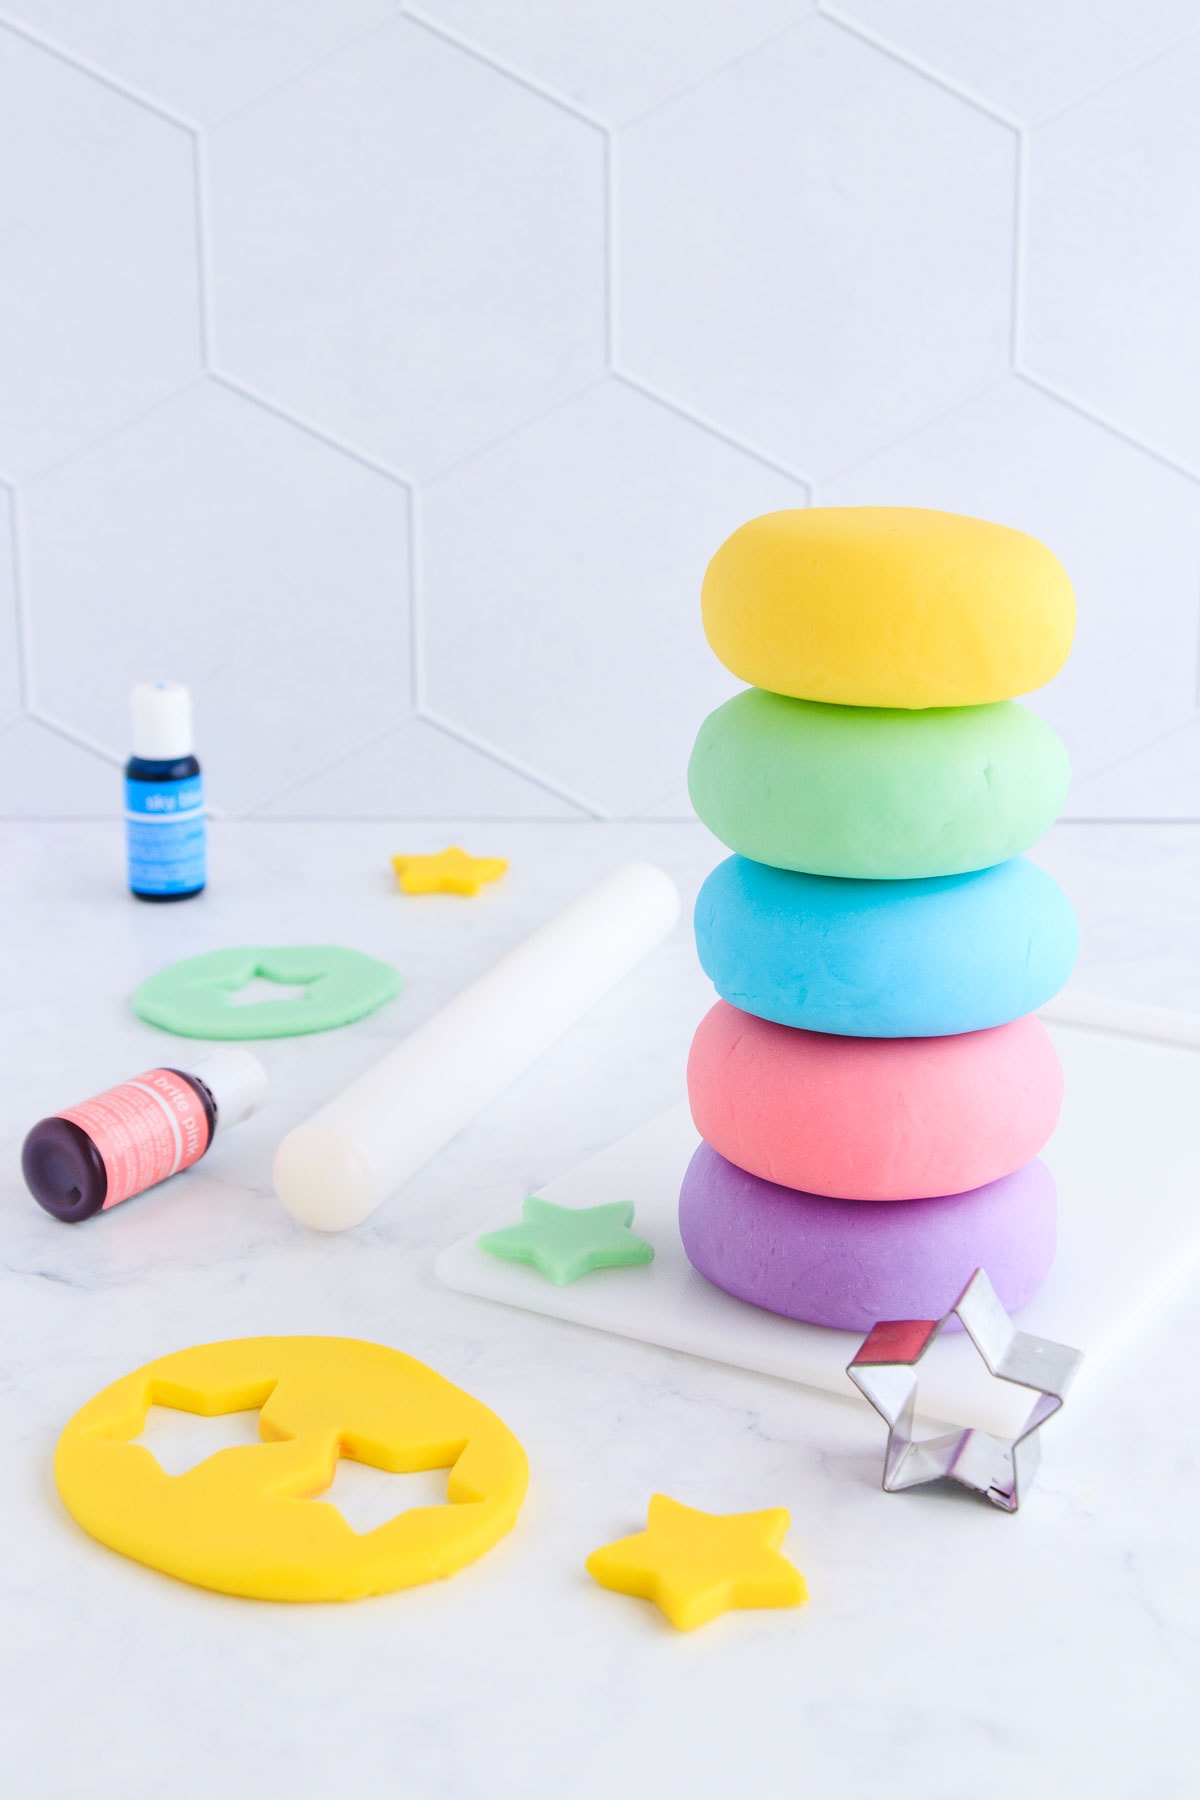
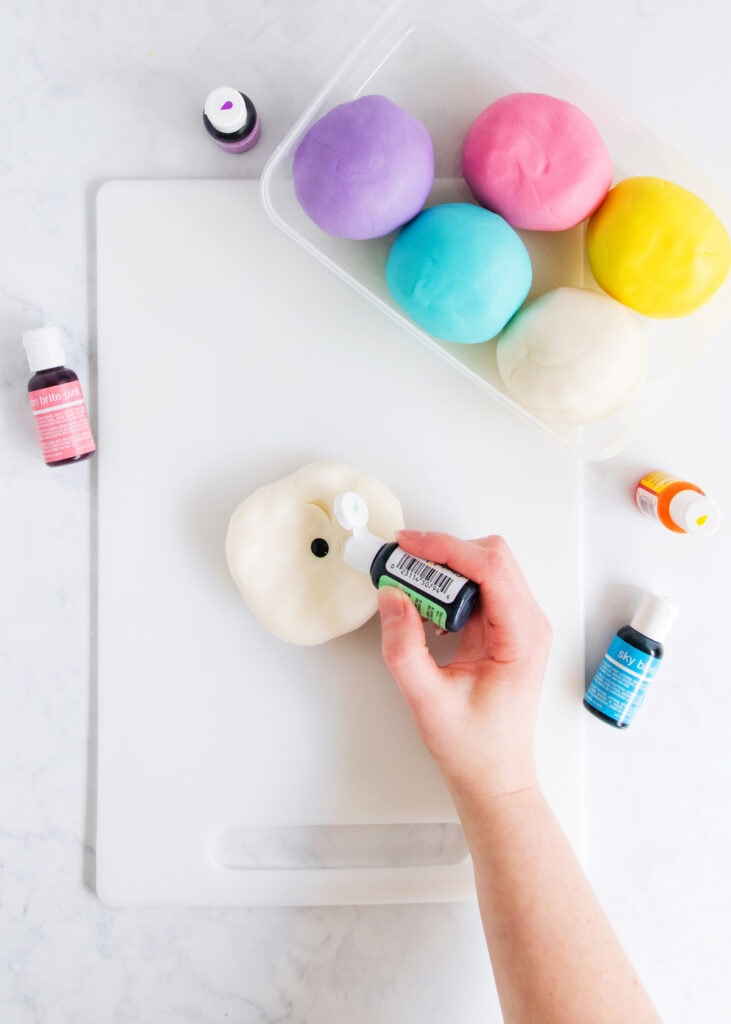
- Food colouring – Gel or paste food colourings are best for this, as they are concentrated and you don’t need much to get a nice colour. Some gel colours are available from supermarkets, otherwise, you can buy them online or at Spotlight. I have used Chefmaster brand here.
If you want to use liquid food colouring instead, it’s best to add it in with the wet ingredients, so the liquid can be cooked out and it won’t make your playdough wet. If using gel colouring, you can split the finished playdough into portions, and knead different colours into each portion.
You can also experiment with natural food dyes. If they’re very liquid-y, I would treat them as above for liquid colourings. This isn’t something I have experience with – in my other life as a cake decorator, I’ve always just used gel colourings so that’s what I have on hand.
Some gf playdough recipes call for gluten free all purpose flour. Different gluten-free flour blends contain different flours and starches in various amounts, and also different thickening gums, so the amount of water and other ingredients needed to make a dough with the right consistency can vary hugely. That’s why this recipe uses rice flour and cornstarch – so that we’re all using the same ingredients and can get the same result.
If all you have is a gf flour blend then, by all means, give this recipe a go, just be prepared that you may need to adjust the amount of water, and your dough may end up with a different consistency to this one.
Optional ingredients
- Peppermint oil or extract – This is optional, I just like the smell of it. Because this playdough doesn’t have a strong smell, you don’t need to add anything to make it smell nicer, but you can if you want to. Any clear extract or flavouring can be used. You can also use essential oils, but be careful as many of them are not food safe.
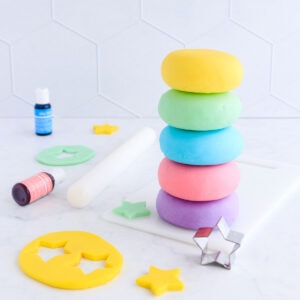
- Glitter – For extra fun playdough, you can add some glitter. If you’re sure your kids won’t eat the playdough, you can use craft glitter, but for younger kids, I would recommend grabbing some edible glitter, which you can buy from Spotlight, or online from a cake decorating supplier like Kiwicakes.
How to make the playdough:
While this does need to be cooked, it’s still super straightforward to make. Scroll down to the recipe card for the full ingredient amounts and instructions.
Pop the white rice flour, cornflour, salt and cream of tartar into a medium saucepan and give them a whisk or stir to combine.

Add in the oil, then gradually pour in the water, stirring as you go. It should turn into a thick slurry.
If you’re using liquid food colouring, you can add it in now.
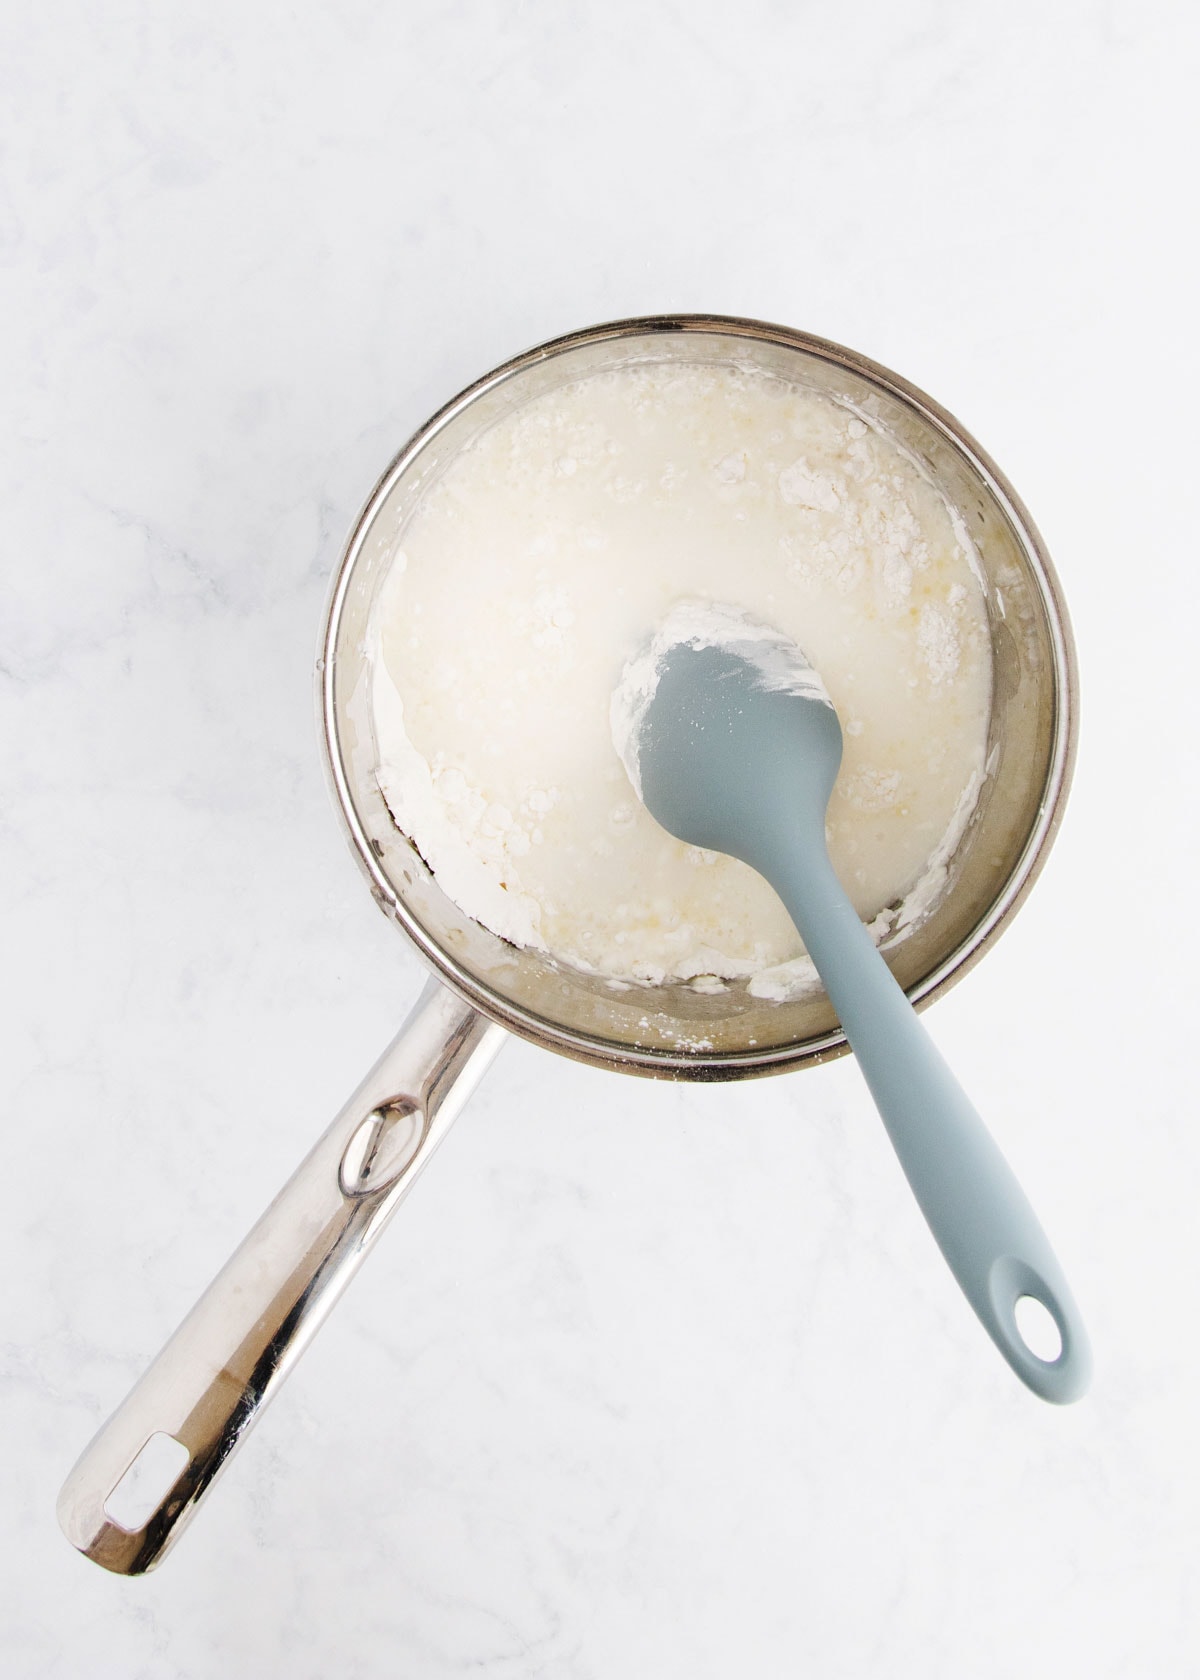
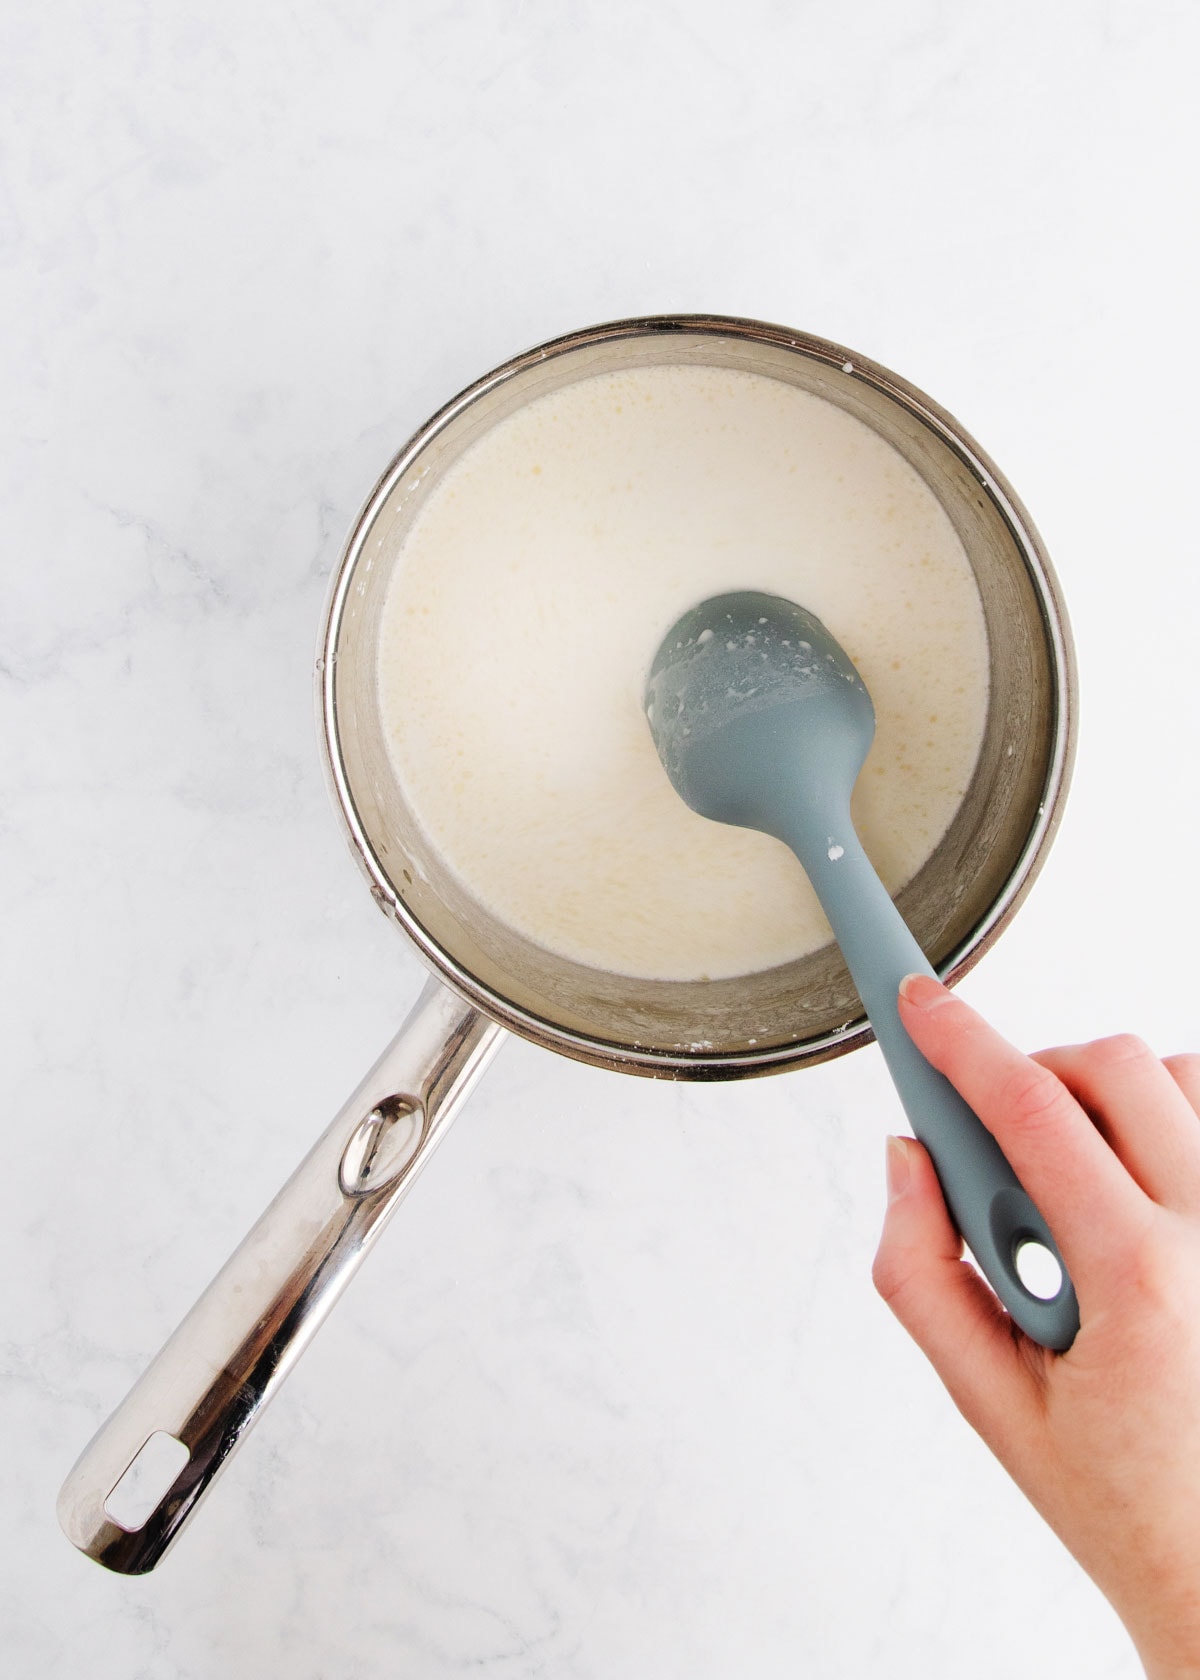
Place the pan over medium-low heat, and stir constantly until the mixture becomes very thick and starts to become a ball. This will take a couple of minutes. Make sure you scrape along the bottom of the pan so nothing burns. If it feels like it is thickening faster than you can stir it, you can lower the heat.
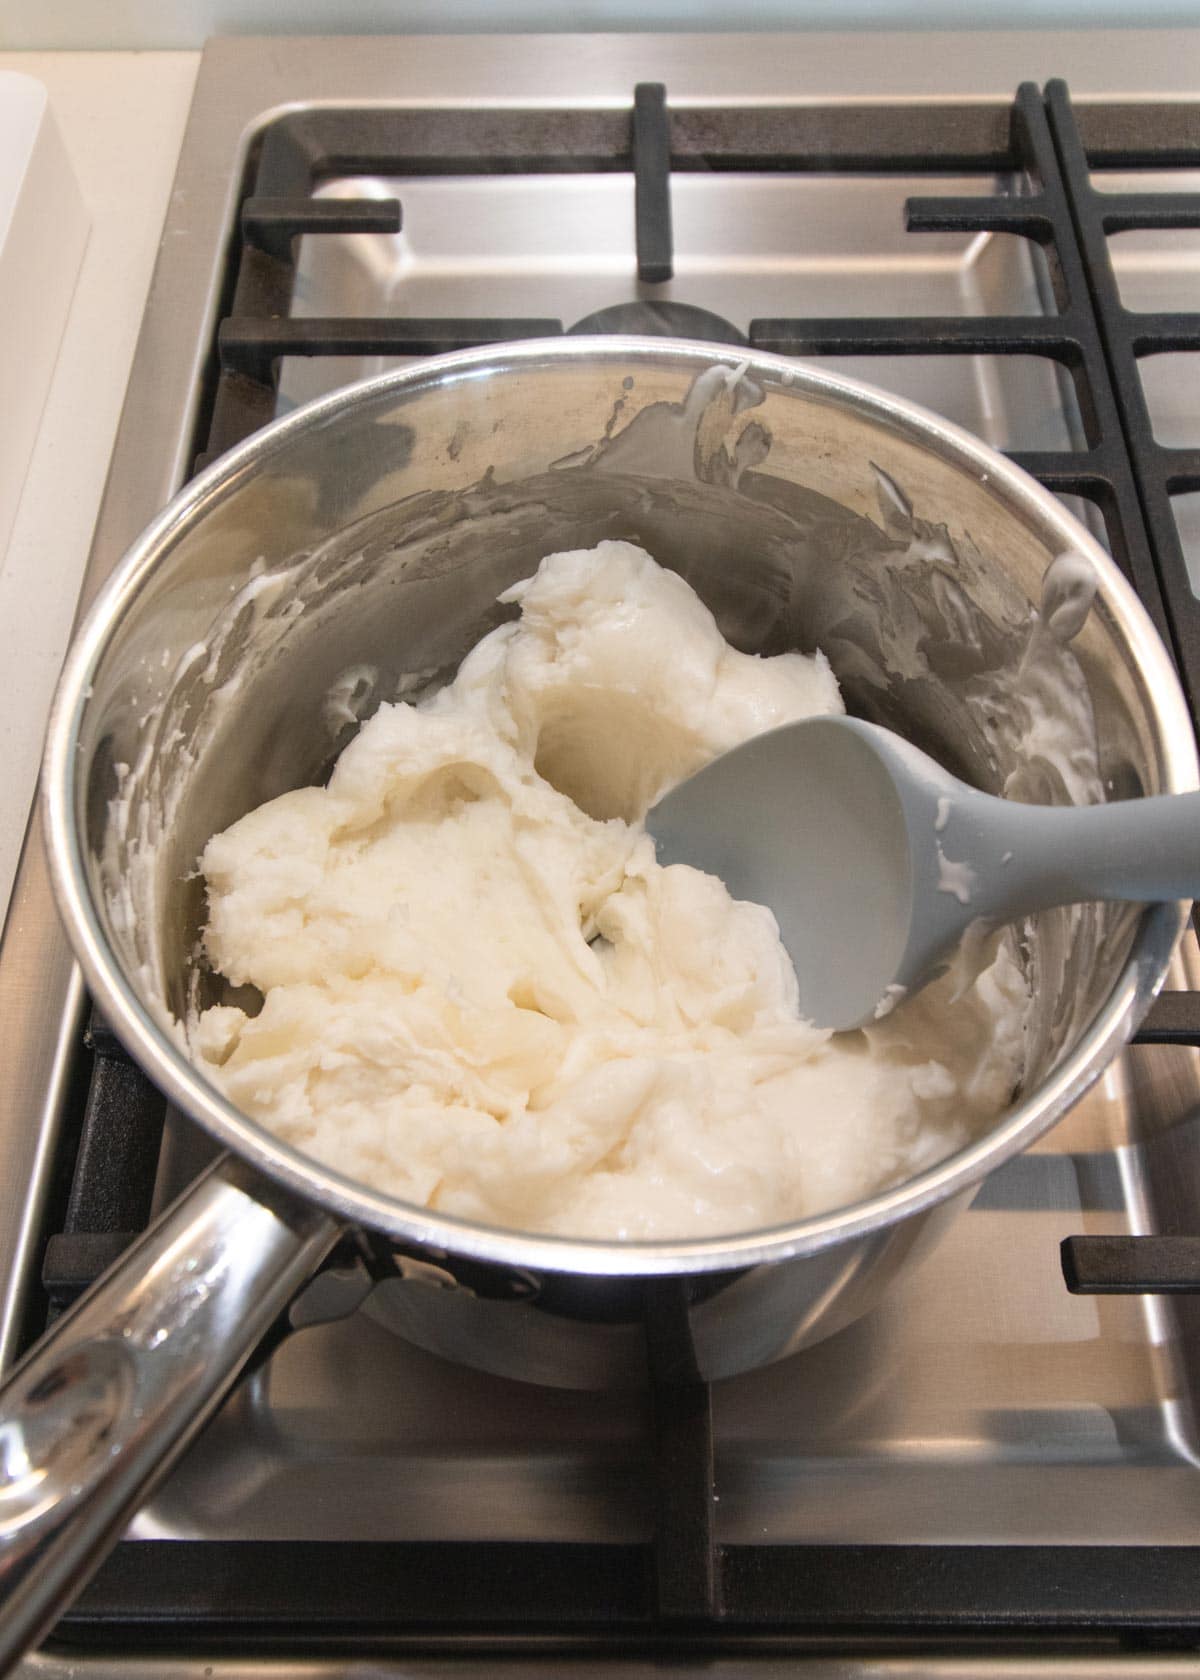
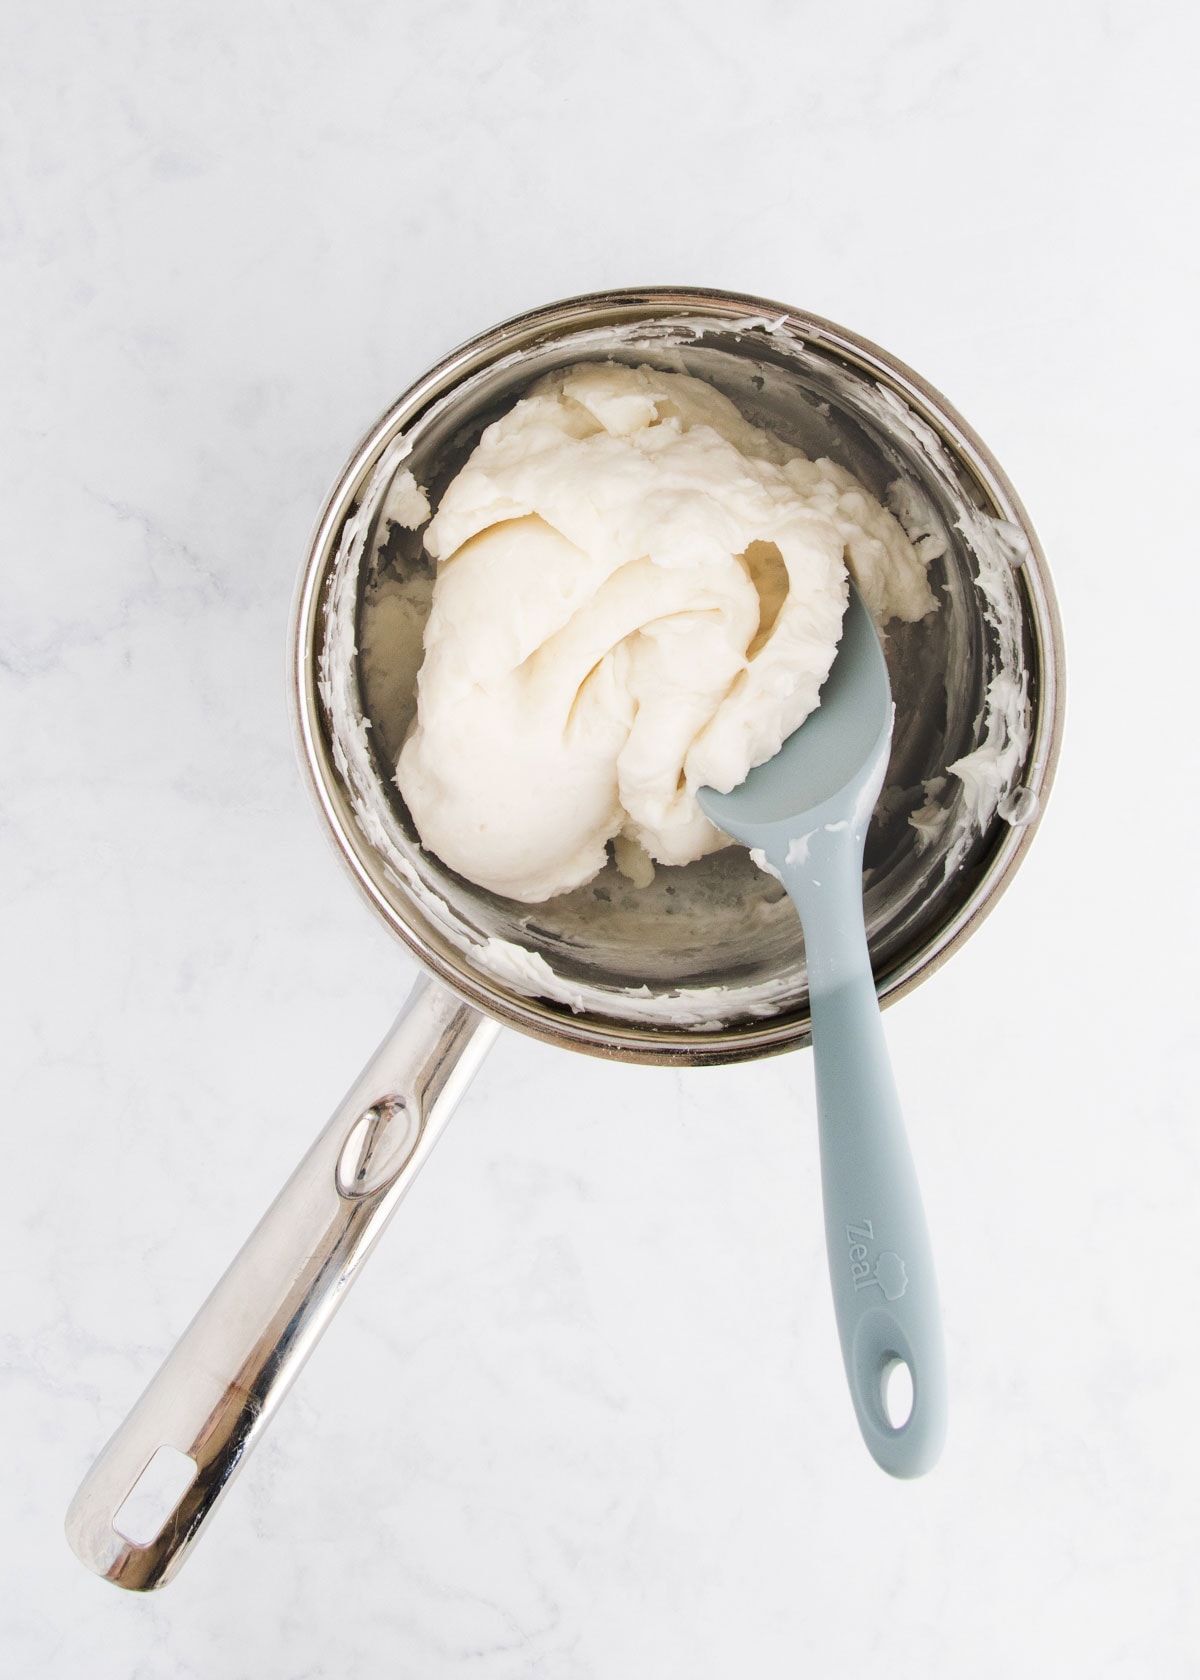
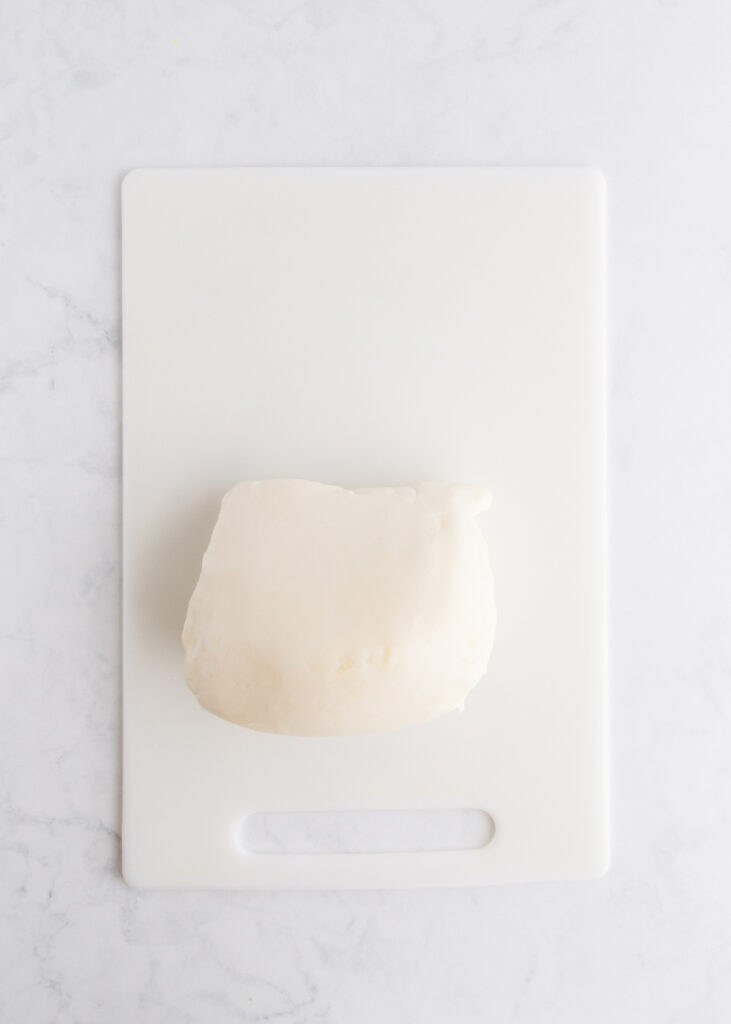
Tip the dough out onto a clean surface and leave to cool until you can comfortably handle it, then knead it briefly until smooth. I like to split the dough in half and knead each half, this makes it easier to get it smooth.
If your kitchen benchtop isn’t heatproof, put the dough onto a thick plastic chopping board, or into a large heatproof bowl until it cools down enough to knead.
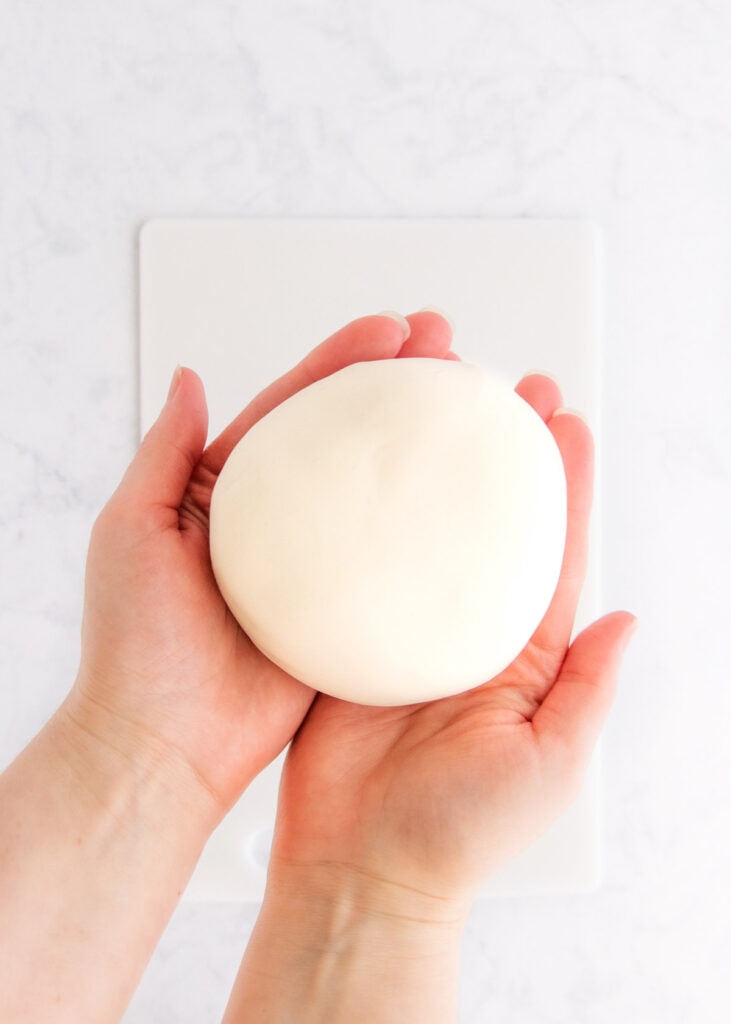
If you’re using gel colouring, this is the time to knead it in. Start with a little bit at a time and add more if needed, as it is very concentrated.
And that’s it! You can play with it now, or pop it into an airtight container or snaplock bag and store it for later.
I actually prefer the texture of the dough after a day or two – it becomes a bit smoother and more stretchy as the flours absorb more of the water and oil. So this is great to make in advance if you know you’re going to need an activity later in the week.
How long does gluten free playdough last?
The unused playdough will keep for at least several weeks in an air-tight container or sealable plastic bag. Once the playdough has been used, as long as it hasn’t been left to dry out, you can pop it into the container and keep it for later.
You can also freeze the unused dough for use at a later date.
Q&A
What is play dough?
Play dough is a squishy dough, traditionally made from wheat flour and various combinations of other ingredients, depending on the recipe. It’s a fun activity for children, which also happens to be great sensory play for gross motor skills and imagination.
Is regular playdough gluten free?
No, most regular store-bought or traditional play dough recipes are not gluten free. Play Doh brand is a proprietary recipe so they don’t say exactly what is in it, but they do state that it does contain gluten. Regular homemade playdough is made with wheat flour, so it’s not gluten free either.
Is it safe for a Coeliac child to play with regular play dough?
Because regular playdough contains gluten, and because most young children tend to touch their faces often, and aren’t necessarily old enough to understand not to put it near their mouths, it’s safer for Coeliac kids not to use regular playdough.
How do you make gluten free play dough less sticky?
This recipe shouldn’t be sticky, but if you find that it is, you can knead in a little more rice flour or cornflour, or rub your hands with a little vegetable oil and knead that into the dough.
How do you make gluten free playdough less lumpy?
The play dough shouldn’t be lumpy, although this can sometimes happen if the dough cooks too quickly and you can’t stir fast enough to keep lumps from forming. But don’t panic! The first thing to do is let the dough cool slightly and then knead it, often the lumps will disappear as you knead. If they don’t, you can roll the dough out thinly with a rolling pin, squashing the lumps, and then knead it all back together and it should be smoother.
Is playdough edible?
All of the basic ingredients in this recipe are edible, so, there are no worries if your little ones decide to sample it, but I would still recommend encouraging them not to since it is very salty and may make them feel a bit sick.
Gluten free playdough at daycare/kindy
Different daycares and kindys will have different procedures for using playdough when there is a gluten free child there.
If they’re happy to make this gluten free playdough for all of the kids, that’s great! Make sure to double check they’re aware of cross-contamination risks in the kitchen (read more about that here).
Otherwise, I would suggest making the playdough at home and putting together a little playdough kit for your child.
Start with a large plastic tray or metal baking tray – Kmart and the Warehouse often have large metal cookie trays for around $5. This gives the child a surface to play on that won’t have other playdough touching it. Then you can grab some fun plastic cookie cutters and a little rolling pin (supermarkets and Kmart often have these quite cheap). Of course, you can also buy Play-Doh brand accessories, and donate the Play-Doh that they come with to someone else who can use it.
You’ll have to chat with the adults in charge about keeping those separate for your child’s use only, but hopefully they will already be familiar with the requirements for a gluten free child, and this won’t be too difficult for them.
But if that’s not an option, this is still a great activity for kids to enjoy at home where it’s safe for them 💜

Have fun! 💜
Gluten Free Play Dough Recipe
Ingredients
- 190 g white rice flour
- 140 g cornflour, (corn starch)
- 120 g table salt
- 1 Tablespoon cream of tartar
- 2 Tablespoons oil, (vegetable or coconut oil)
- 560 ml water
- A few drops gel or liquid food colouring., (see notes)
- A few drops peppermint oil, (optional)
Instructions
- Mix together the white rice flour, cornflour, salt, and cream of tartar in a medium sized saucepan. You don't need to sift the flours unless they're particularly lumpy.
- Add the oil into the dry ingredients, then gradually add in the water, stirring as you go until it becomes a smooth, thick slurry. If you're using liquid food colouring, this is the time to add it. See the notes below if you want to make more than one colour of dough.
- Cook over medium heat, stirring constantly with a silicone spatula or wooden spoon, until the mixture thickens and becomes a dough. Make sure you're scraping along the bottom of the pan as you stir, so it doesn't get stuck. If it's thickening too fast for you to stir properly, reduce the heat slightly.When it's done, it may still look a bit sticky and won't form a proper smooth ball like regular playdough, but there shouldn't be any very wet/liquidy patches left.
- Tip the dough out onto a heatproof surface (or into a bowl if your bench isn't heatproof) and once it cools down enough to handle, knead it until smooth. If you're using gel colouring, you can split the dough into pieces, and knead the gel colouring (a small amount at a time) to each piece, adding more colour if needed.
- And that's it! You can play with the dough now, or store it for later.
Storing the Playdough
- The unused playdough will keep for at least several weeks in an air-tight container or sealable plastic bag. Once it has been used, as long as it hasn't been left to dry out, you can pop it into a container and keep it for later. You can also freeze the unused dough for use at a later date.
Notes
You May Also Like…

Hello, just wondering instead of cooking the playdough on the stove, would I be able to use boiling water instead?
Hi Tabatha, this recipe definitely requires cooking, the mixture is quite runny at the start and thickens as it cooks. You could possibly make it in the microwave instead if you don’t want to use the stove, but you’ll need to keep a close eye on it and stop and stir it regularly to make sure it doesn’t clump up. Hope that helps 🙂
What kind of rice flour do you recommend? I have Mochiko which is a sweet rice flour and is stickier than long grain rice flour.
Hi Jess, I just used the Freshlife rice flour from Countdown/Woolworths for this. I usually use Ceres Organics flour for baking, but for playdough it doesn’t make much difference to the finished product, so cheaper is better. I haven’t tried the recipe with sweet rice flour – my guess is that it should still work but it will likely thicken quicker than the regular rice flour as it is much higher in starch. So I would keep a close eye on it while it’s cooking, and take it off sooner once it’s thickened.
If you give it a go I would love to know how it turns out 💜 x Natalie
I followed this recipe to an T and it was so sticky. We had to throw it away.
Hi B, I’m so sorry to hear that! It sounds like something might have gone wrong, as the playdough should turn out as pictured. Happy to try and help you troubleshoot if you’d like. The main thing I can think of is that it may not have been cooked for long enough. Did the mixture thicken to the stage shown in the step-by-step pictures? Or did it stay runny?
followed the recipe and it turned out great! once I pulled it out of the pot, i set it on the counter and flipped it a few times so both sides could dry out. Then I stuck it on an air fryer basket (or a wire rack would work) to get some airflow and let it finish drying until not sticky. worked great, thank you! I needed gluten-free playdoh for our homeschool co-op
Hi,
I am a teacher and every time I make this it ends up sticky, even if I add extra cornflour to the dough! Then I end up having to throw it away! Please help! What am I doing wrong?!
Hi Leandri, oh no, is it possible it hasn’t been cooked for long enough? Does it thicken into a playdoh texture but it sticks to your hands, or does it just not thicken? If you happen to have a photo of it, you’re welcome to email it to me so I can have a look (natalie @ glutenfreekiwifavourites.com – just take out those spaces) Hopefully we can get to the bottom of this 🤞
Hi thanks for your reply! It thickens and seems fine but the next day it sticks to the kids hands. I will send a picture the next time I make some !
Thanks heaps 🙂
Ooh that’s so odd, I haven’t had that happen. Hmm, you could maybe try increasing the oil a bit, maybe to 3 or 4 Tablespoons. That might hopefully stop some of the sticking. But yes if you can get a picture of it next time maybe something else will come to mind 🤞
It turned out great! I enjoyed the texture and pliability more than regular playdough. And my son loved that he could play with it and not worry about gluten being all over his hands.
I used brown rice flour and kneaded in natural food colorings and they all came out nicely. Thank you!
Yay!
We used to make playdough all the time, but over a year ago one of my kiddos was diagnosed celiac and we hadn’t made it since.
We used a kitchen scale to measure ingredients and this worked beautifully! Natural food dyed were a great final touch. We will see how it holds up over time and if it gets sticky later on.
i love your comment very much its interesting
i love the look of the playdoh very interesting